 Flat lay photography is all the rage right now and if you are looking for some tips to up your flat lay game you have come to the right place. I am going to be sharing all my tips and tricks for creating the perfect flat lay.
Color
When I am thinking of a flat lay image to create, one of the first steps is to pick a color scheme. What are the primary colors that I am going to be working with and how do I want them to interact with each other? If you are new to color theory, spend some time familiarizing yourself with a color wheel so you can learn which colors go well together and which colors do not. Once I have my colors picked out, I can easily go through my props and pick out things that will work well with my photo.
The Background
It goes without saying that your background is a key part of building the perfect flat lay. Are you using just a plain white background or is there something else you could use that would enhance your image and add to the storytelling or visual pleasure of the image.
My current go to background for flat lays is this green table cloth. I have a few of these cloths in other colors. What I love about this table cloth is the subtle sheen that it reflects as the fabric wrinkles. It adds visual depth to my images and I also work it into my color scheme. The dark green color also adds contrast to the image and makes the lighter colored objects really pop.
Texture, Shape, and Size
Ok, so we have picked out our flat lay colors and incorporated a background that is going to work well with them. Now what? I like to start by laying out my props and looking at the different sizes and shapes. You want to have variety in your images because it is much more visually stimulating than looking at the same thing over and over again. Maybe you place a few smaller items next to something larger. Or you choose some larger circular objects and then mix things up by adding in a small square or medium sized triangle shaped object. Remember variety is the spice of life.
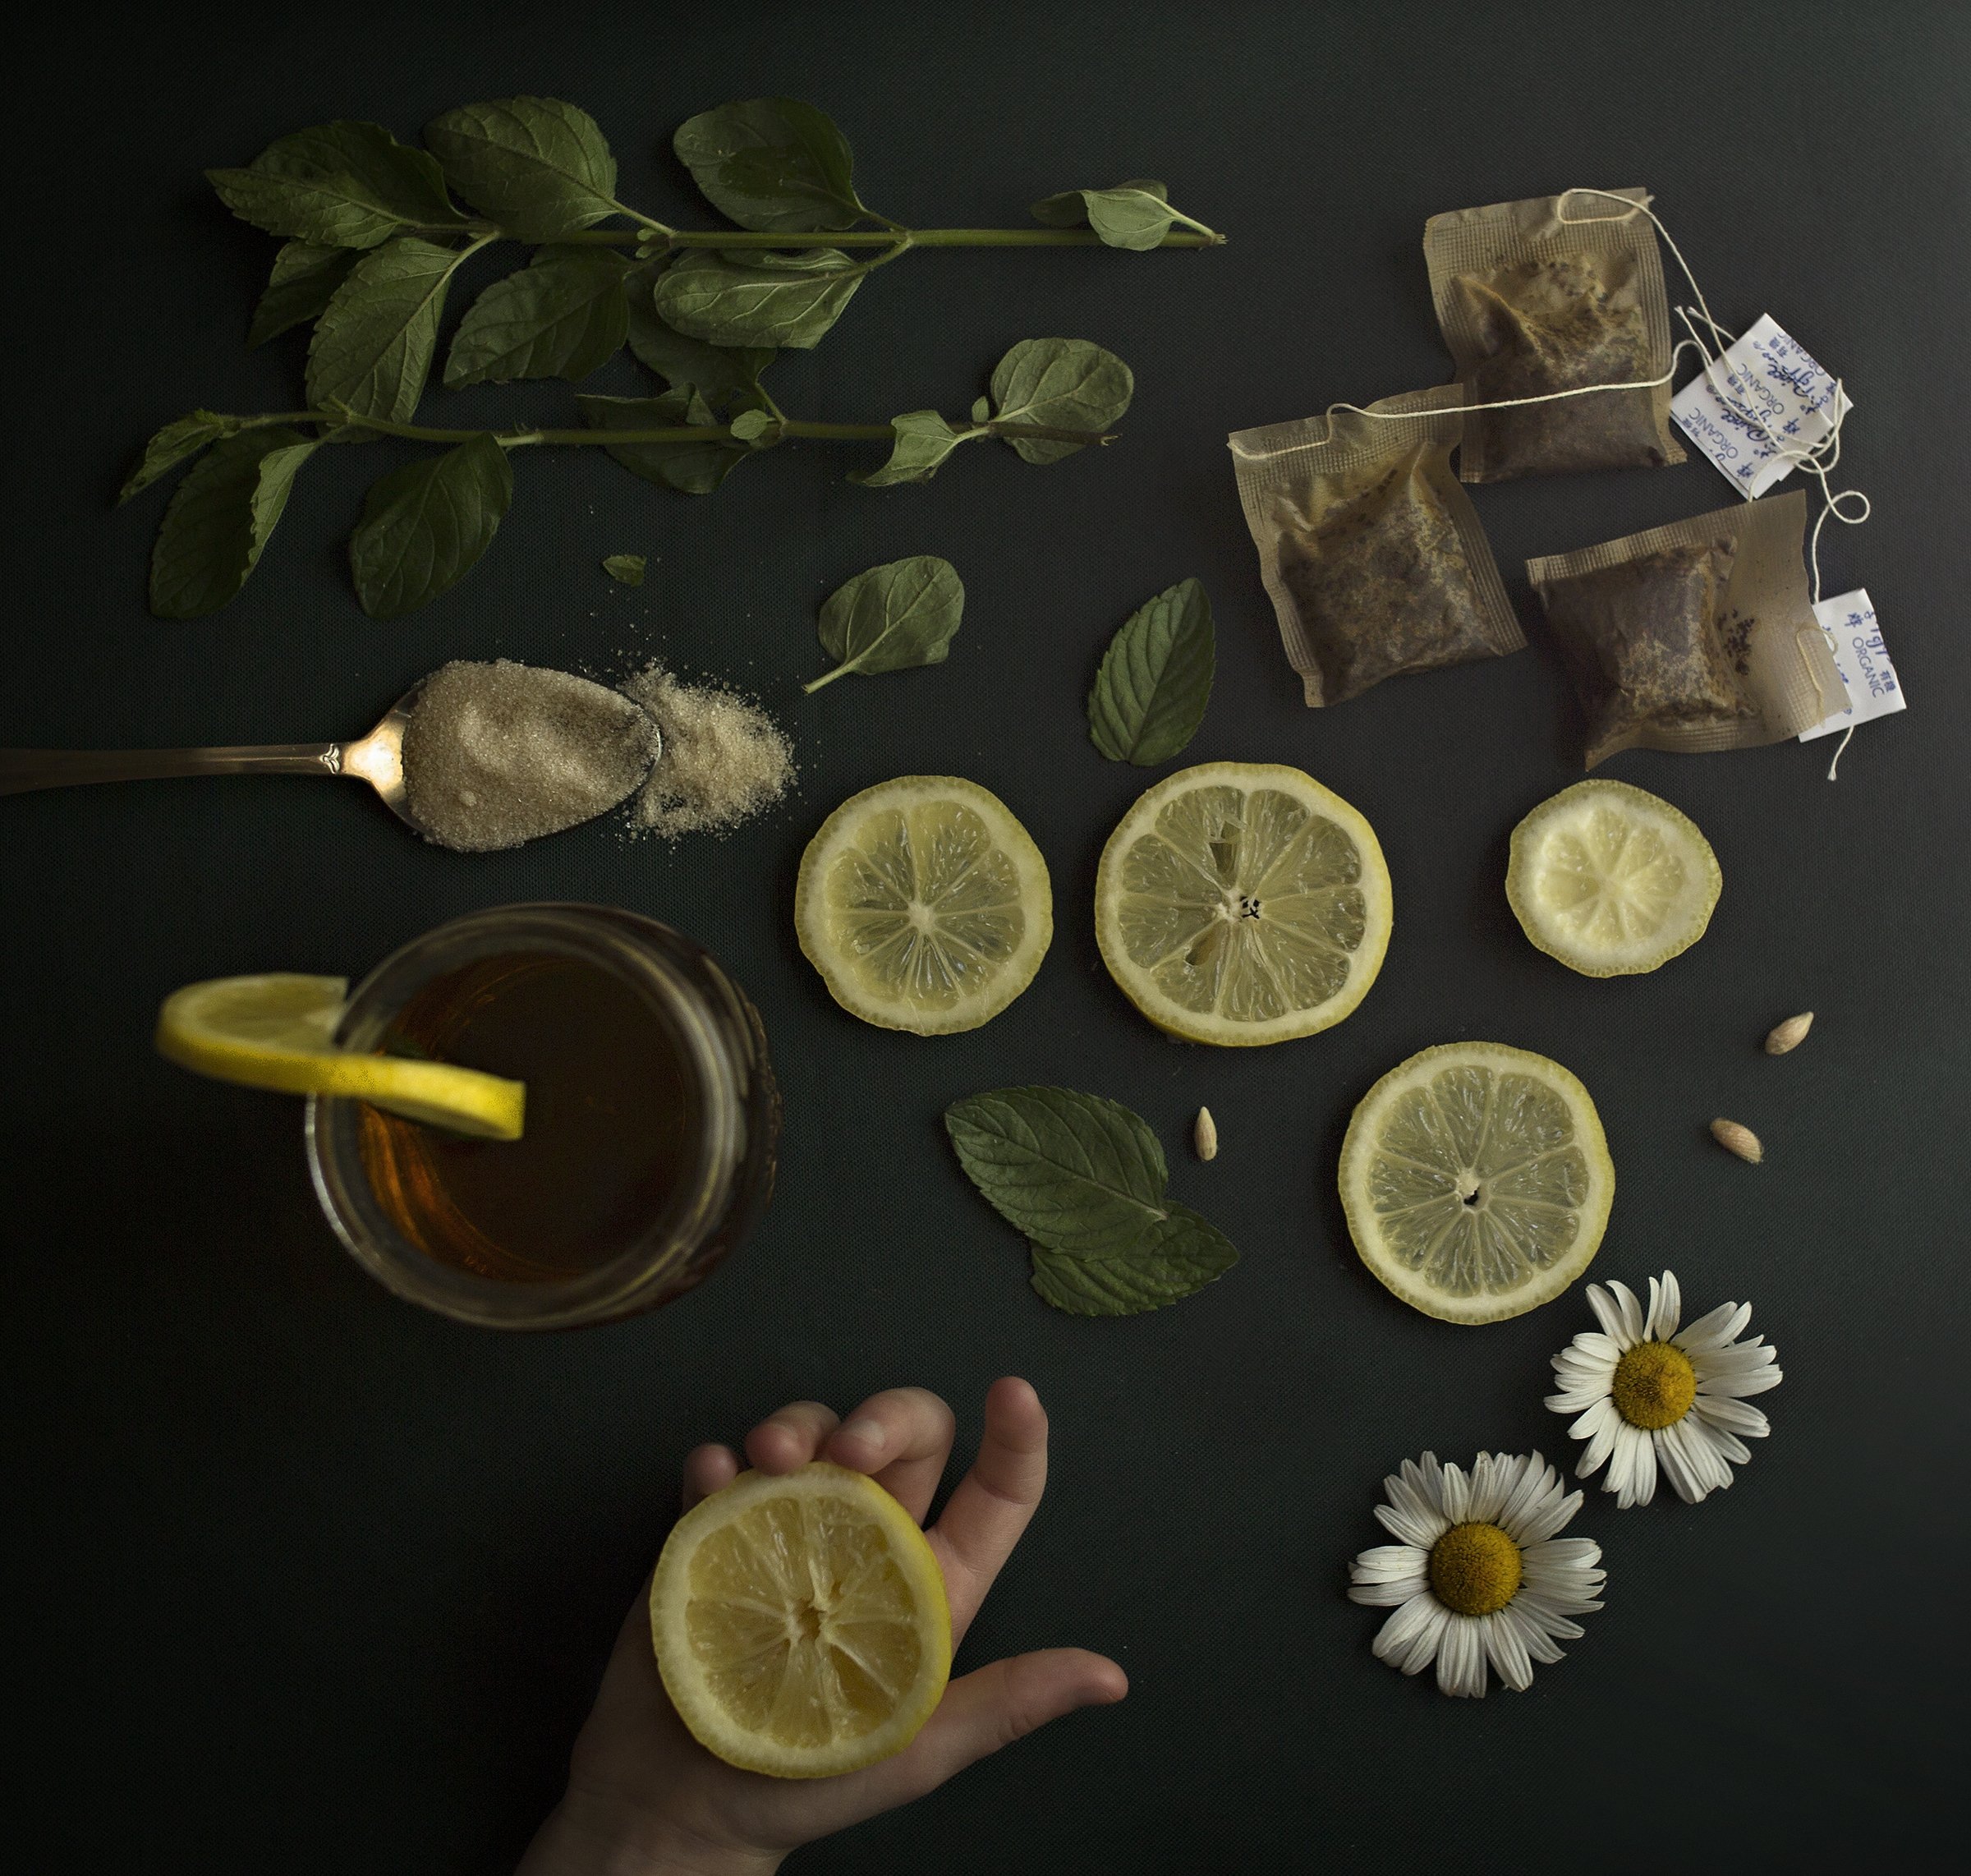
You can see here I have put round lemons and square tea bags together. Then I have chosen to incorporate the rougher texture of the mint leaves and the daisies. There is also a hard, shiny spoon in the image.
Also consider this when you are choosing items based on their texture. I love to have a smooth, shiny object that will reflect light well like a spoon or a mirror and contrast that with something with a much rougher texture like piece of wood or a chunky wool fabric.
NOTE: A great tip is to use water to make your objects even more reflective. If you are using a glass or cup in your flat lay fill it with something. The reflection of the liquid will really add dimension to your image. If you are photographing food, like strawberries for example, spritz them with a little water and watch how the droplets reflect the light in your image. In the image above my tea bags are wet, which makes them look totally different than if they were dry. It also adds to the storytelling because the viewer can image that the tea bags were already used to make the tea.
Choose a Focal Point/Main Image
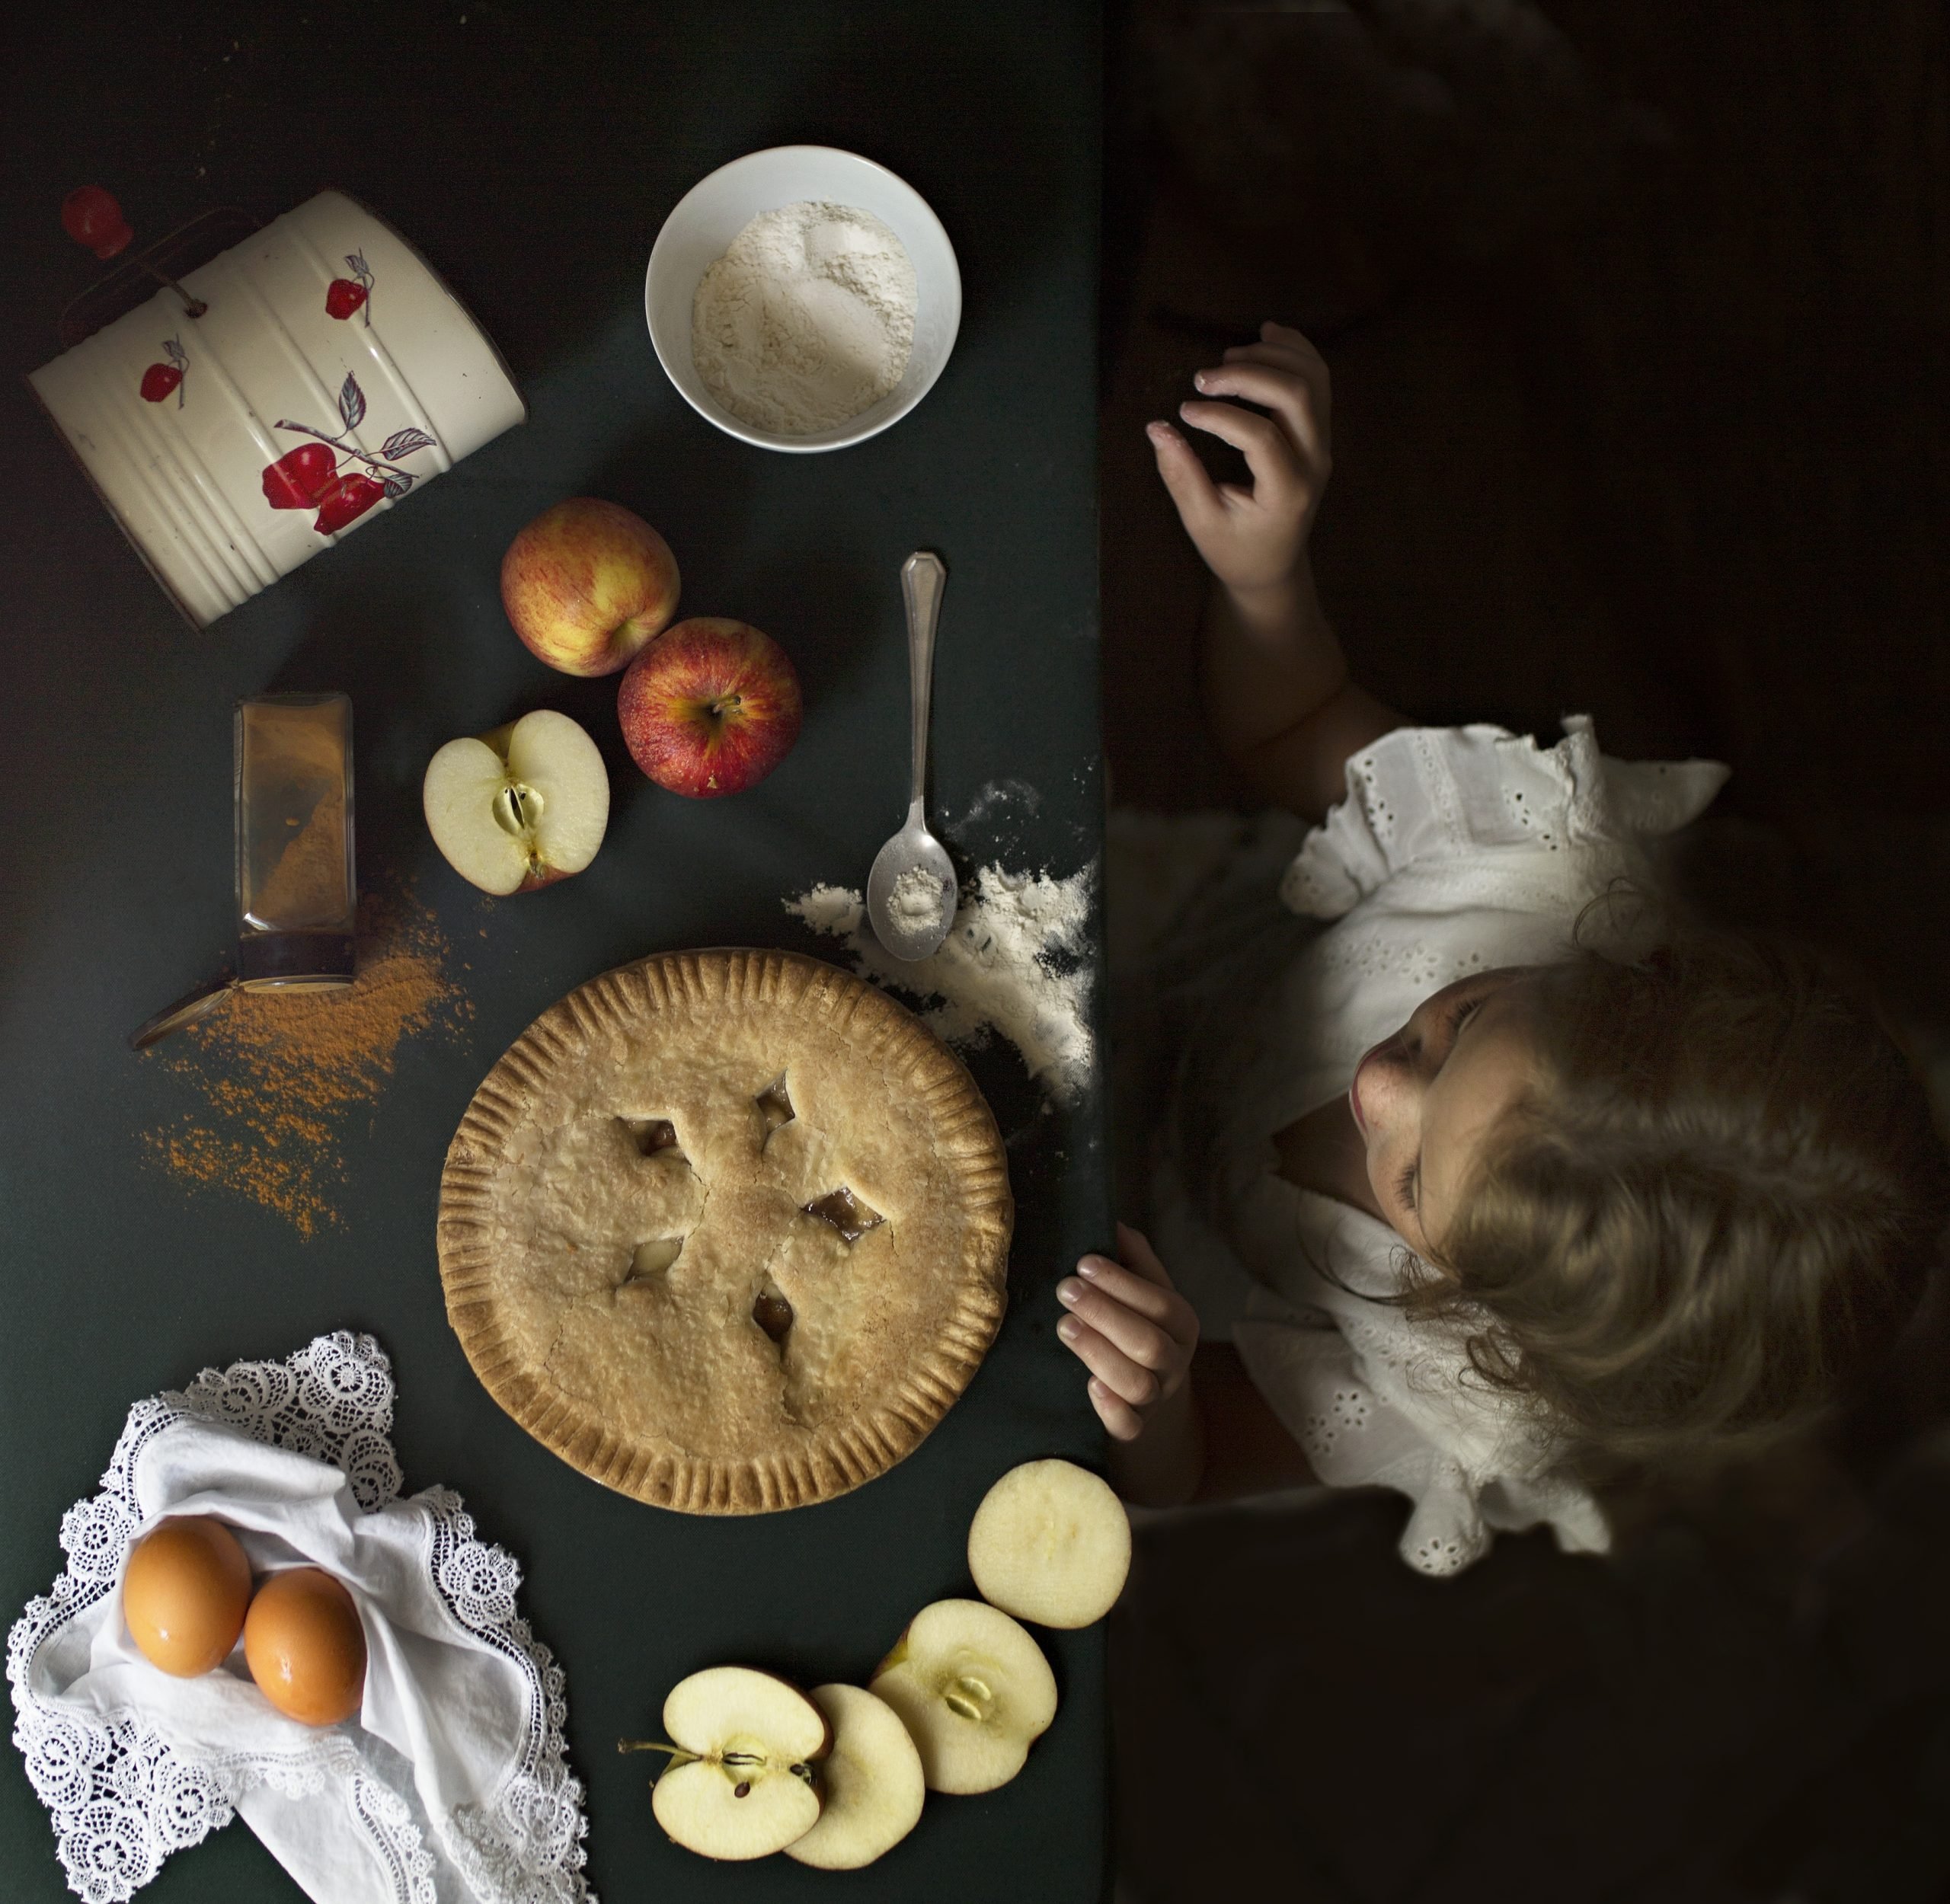
Ok, so you have followed all the other steps and it’s time to actually set up your flat lay for photographing. I like to choose one main object to build my flat lay around. This object could be the main idea of your flat lay.
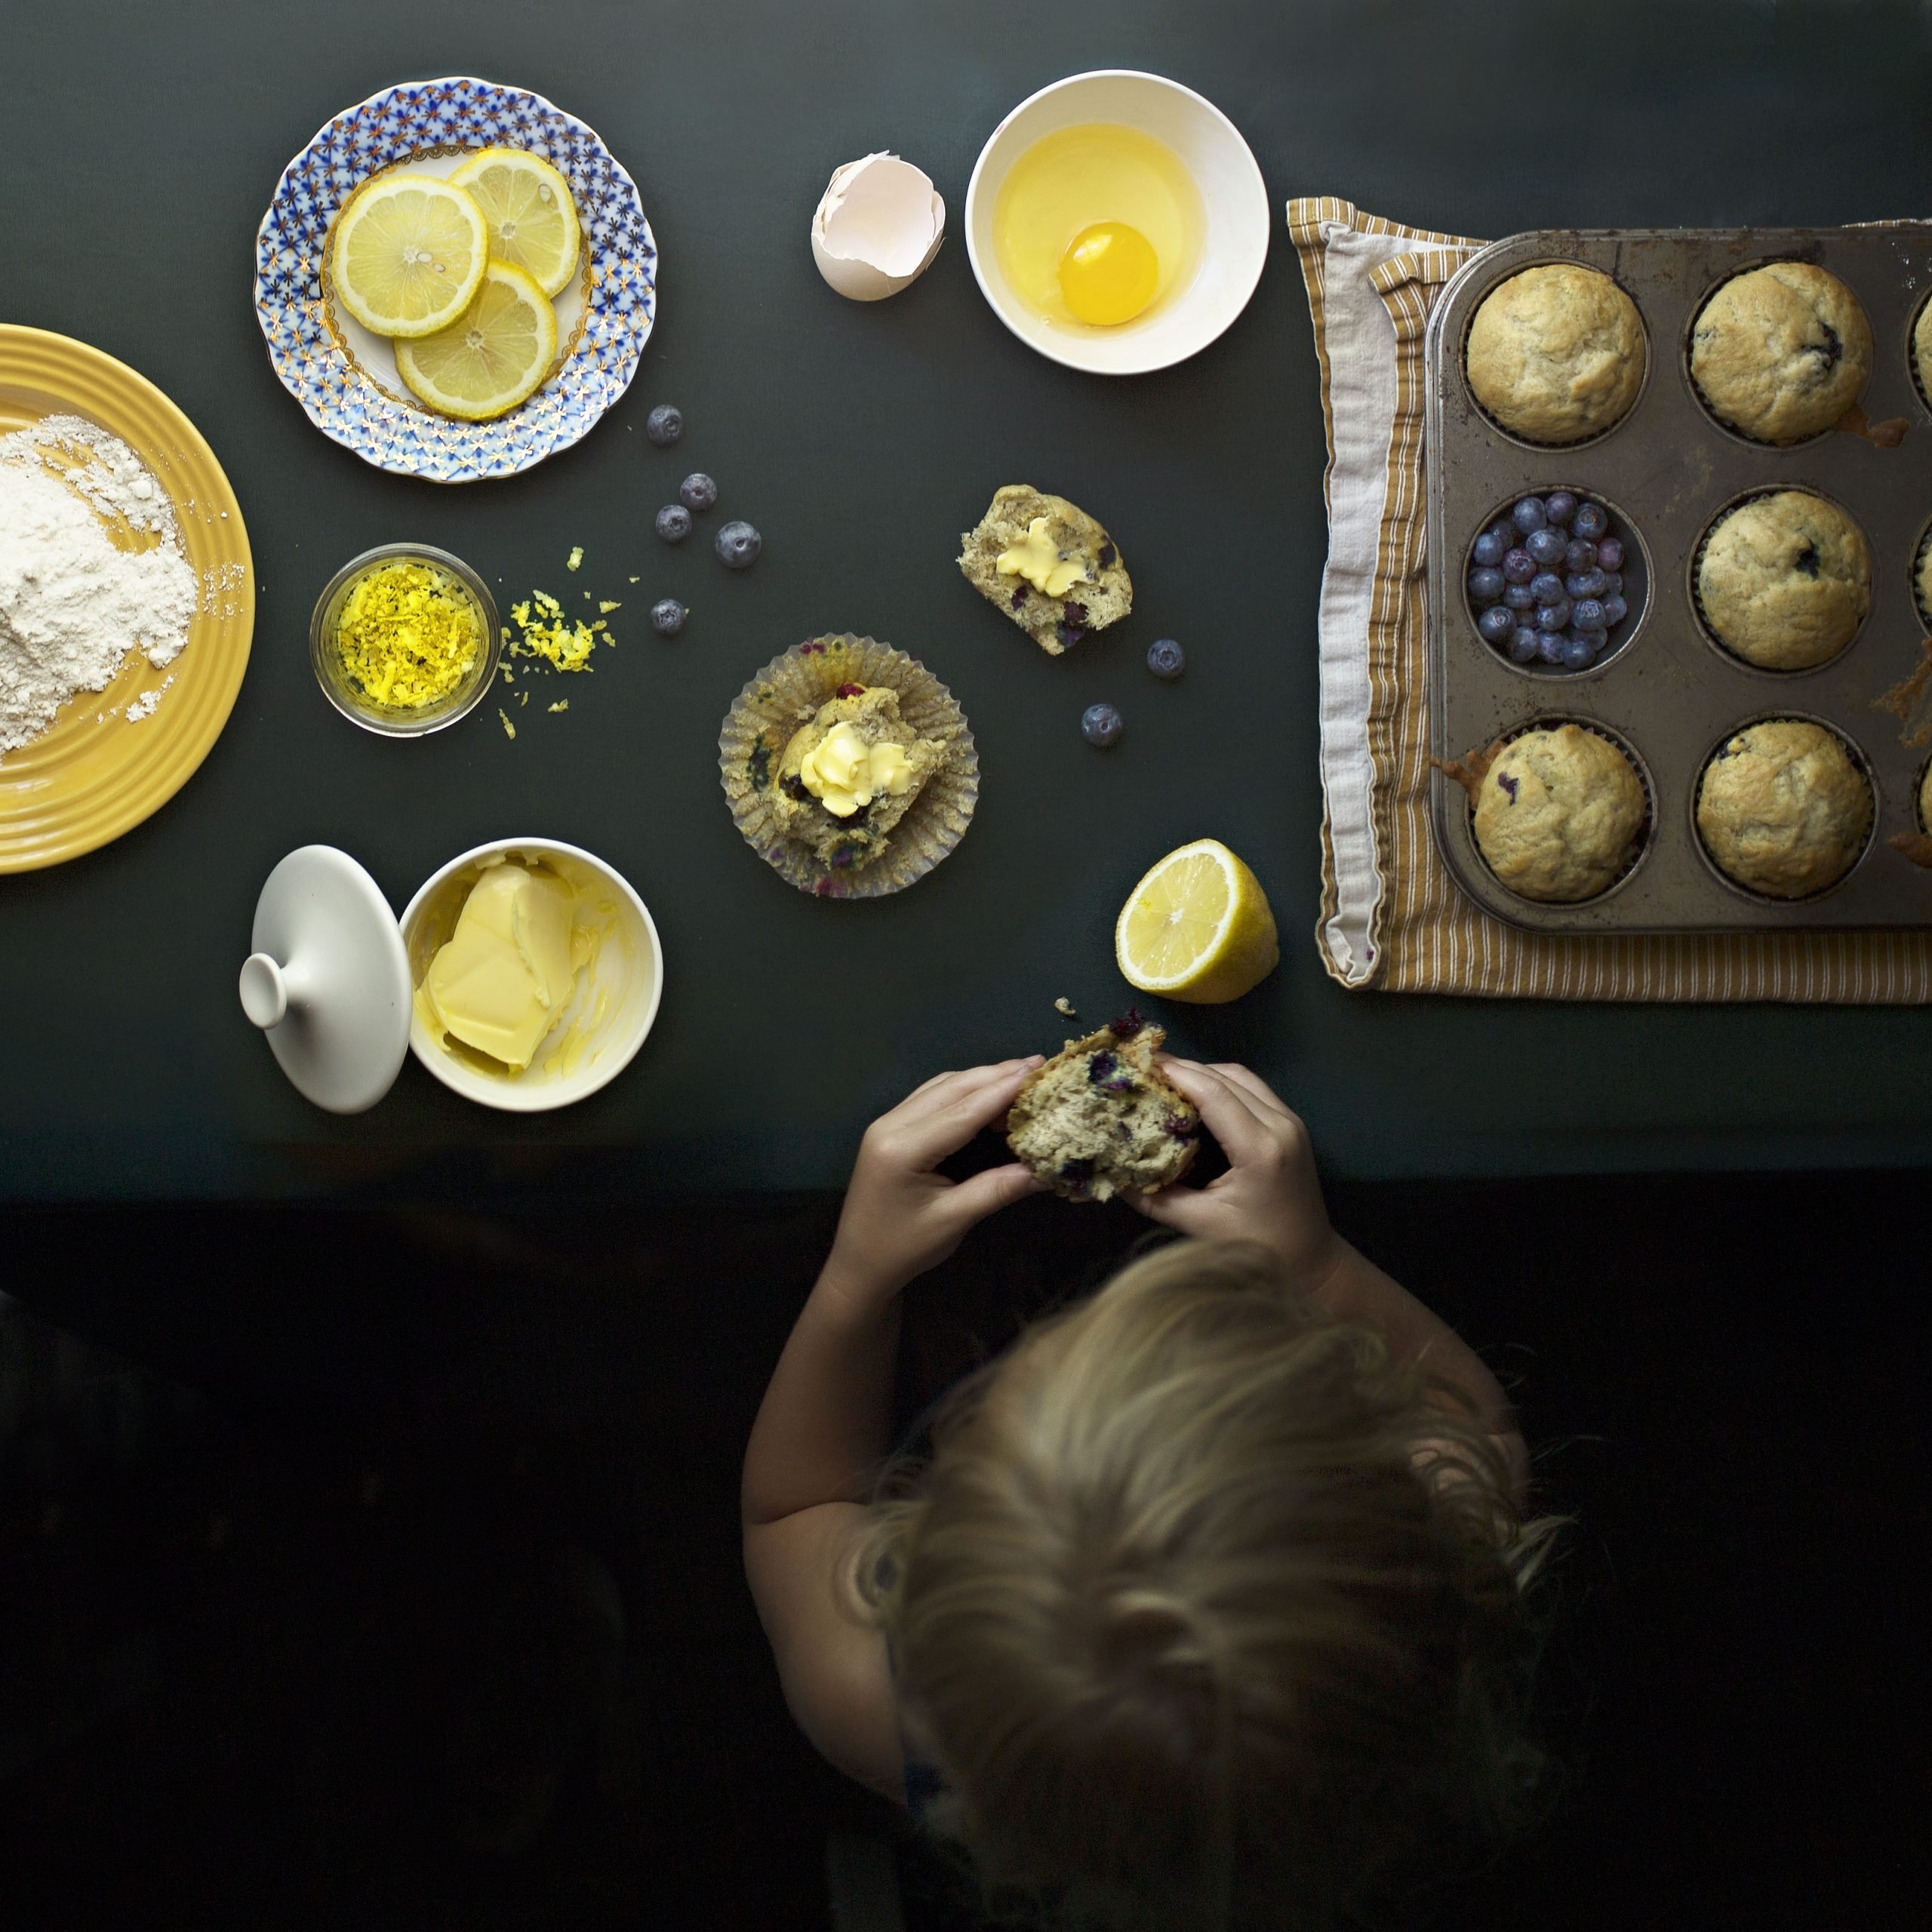
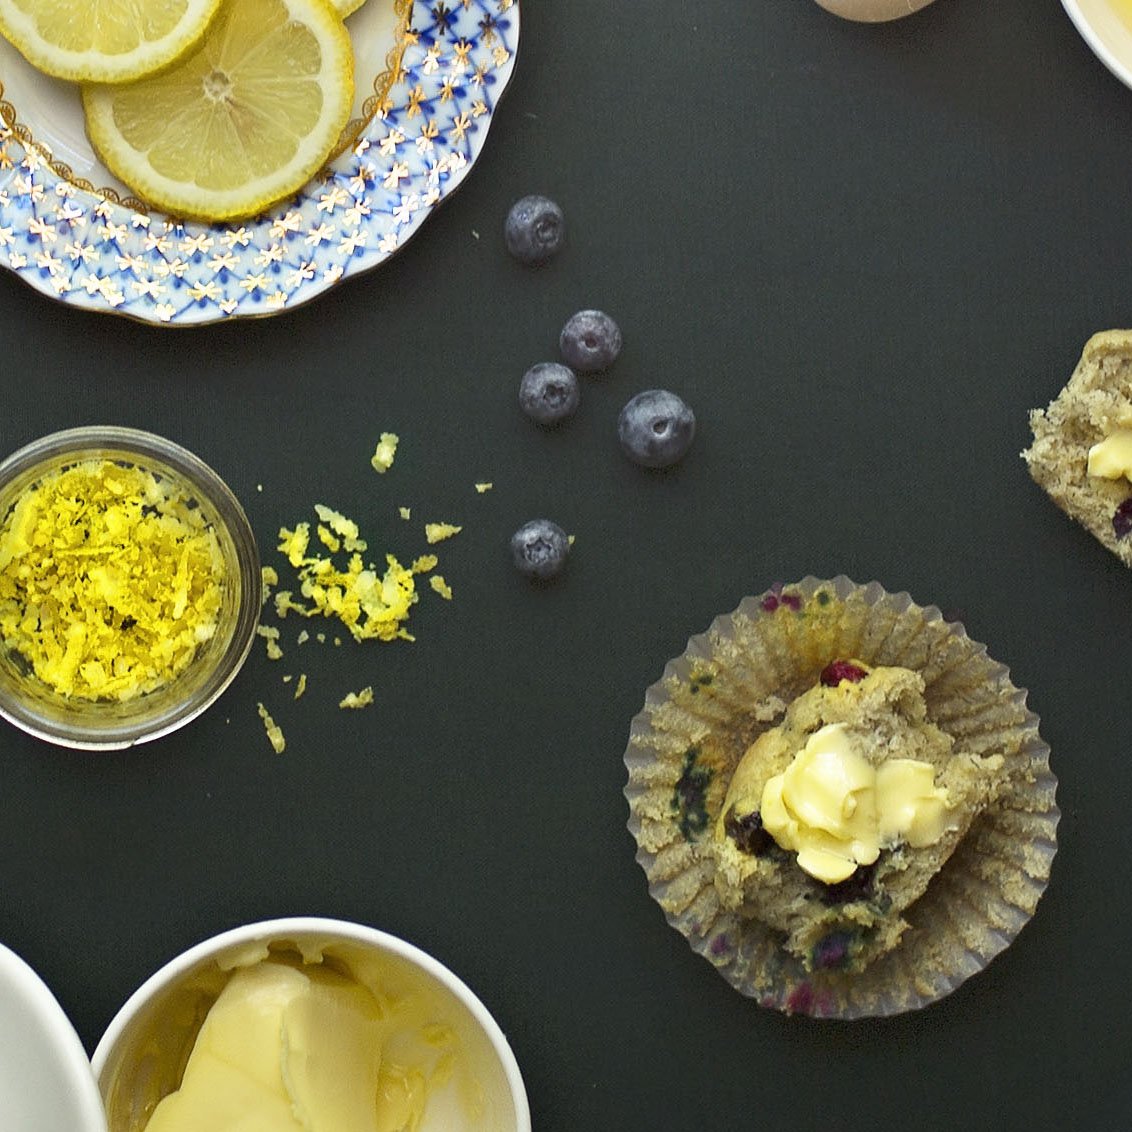
For example, in this flat lay of my son with the blueberry muffins the theme is…well you guessed it..blueberry muffins. So I have put a blueberry muffin front and center. I then incorporate all the different ingredients or utensils that helped me produce that blueberry muffin into the image. It tells a story of how we created the blueberry muffin and all the work that went into it to produce the end result of my son actually eating and enjoying the muffin.
How to Place your Objects within the Frame
This, in my opinion, is probably the most challenging and fun part of setting up a flat lay. And it is the part that I struggled with the most in the beginning. Where do I put all these dang props?? I like to place my images evenly apart. If I have two objects that are touching then it is for a very specific reason. Having space between each object helps with visual clarity and it helps the viewer to “see” all the objects in your image. It is much harder to “find” an object if it is covered up by a lot of other objects.
Think of an “I Spy” book. The easier pages have all the objects laid out in the open for you to easily spot. In the harder pages things are hidden under other things, or partially covered up. Having things place evenly apart creates a sense of order and calm for the viewer. Having things in a cluttered mess creates a sense of chaos and disorder.
Now I am going to go against everything I just said in the last paragraph and talk about creating layers and creating messes lol! Layering is an important technique in creating a flat lay because it creates visual depth and holds the viewer’s eye for longer. It is more stimulating. But you need to layer carefully!
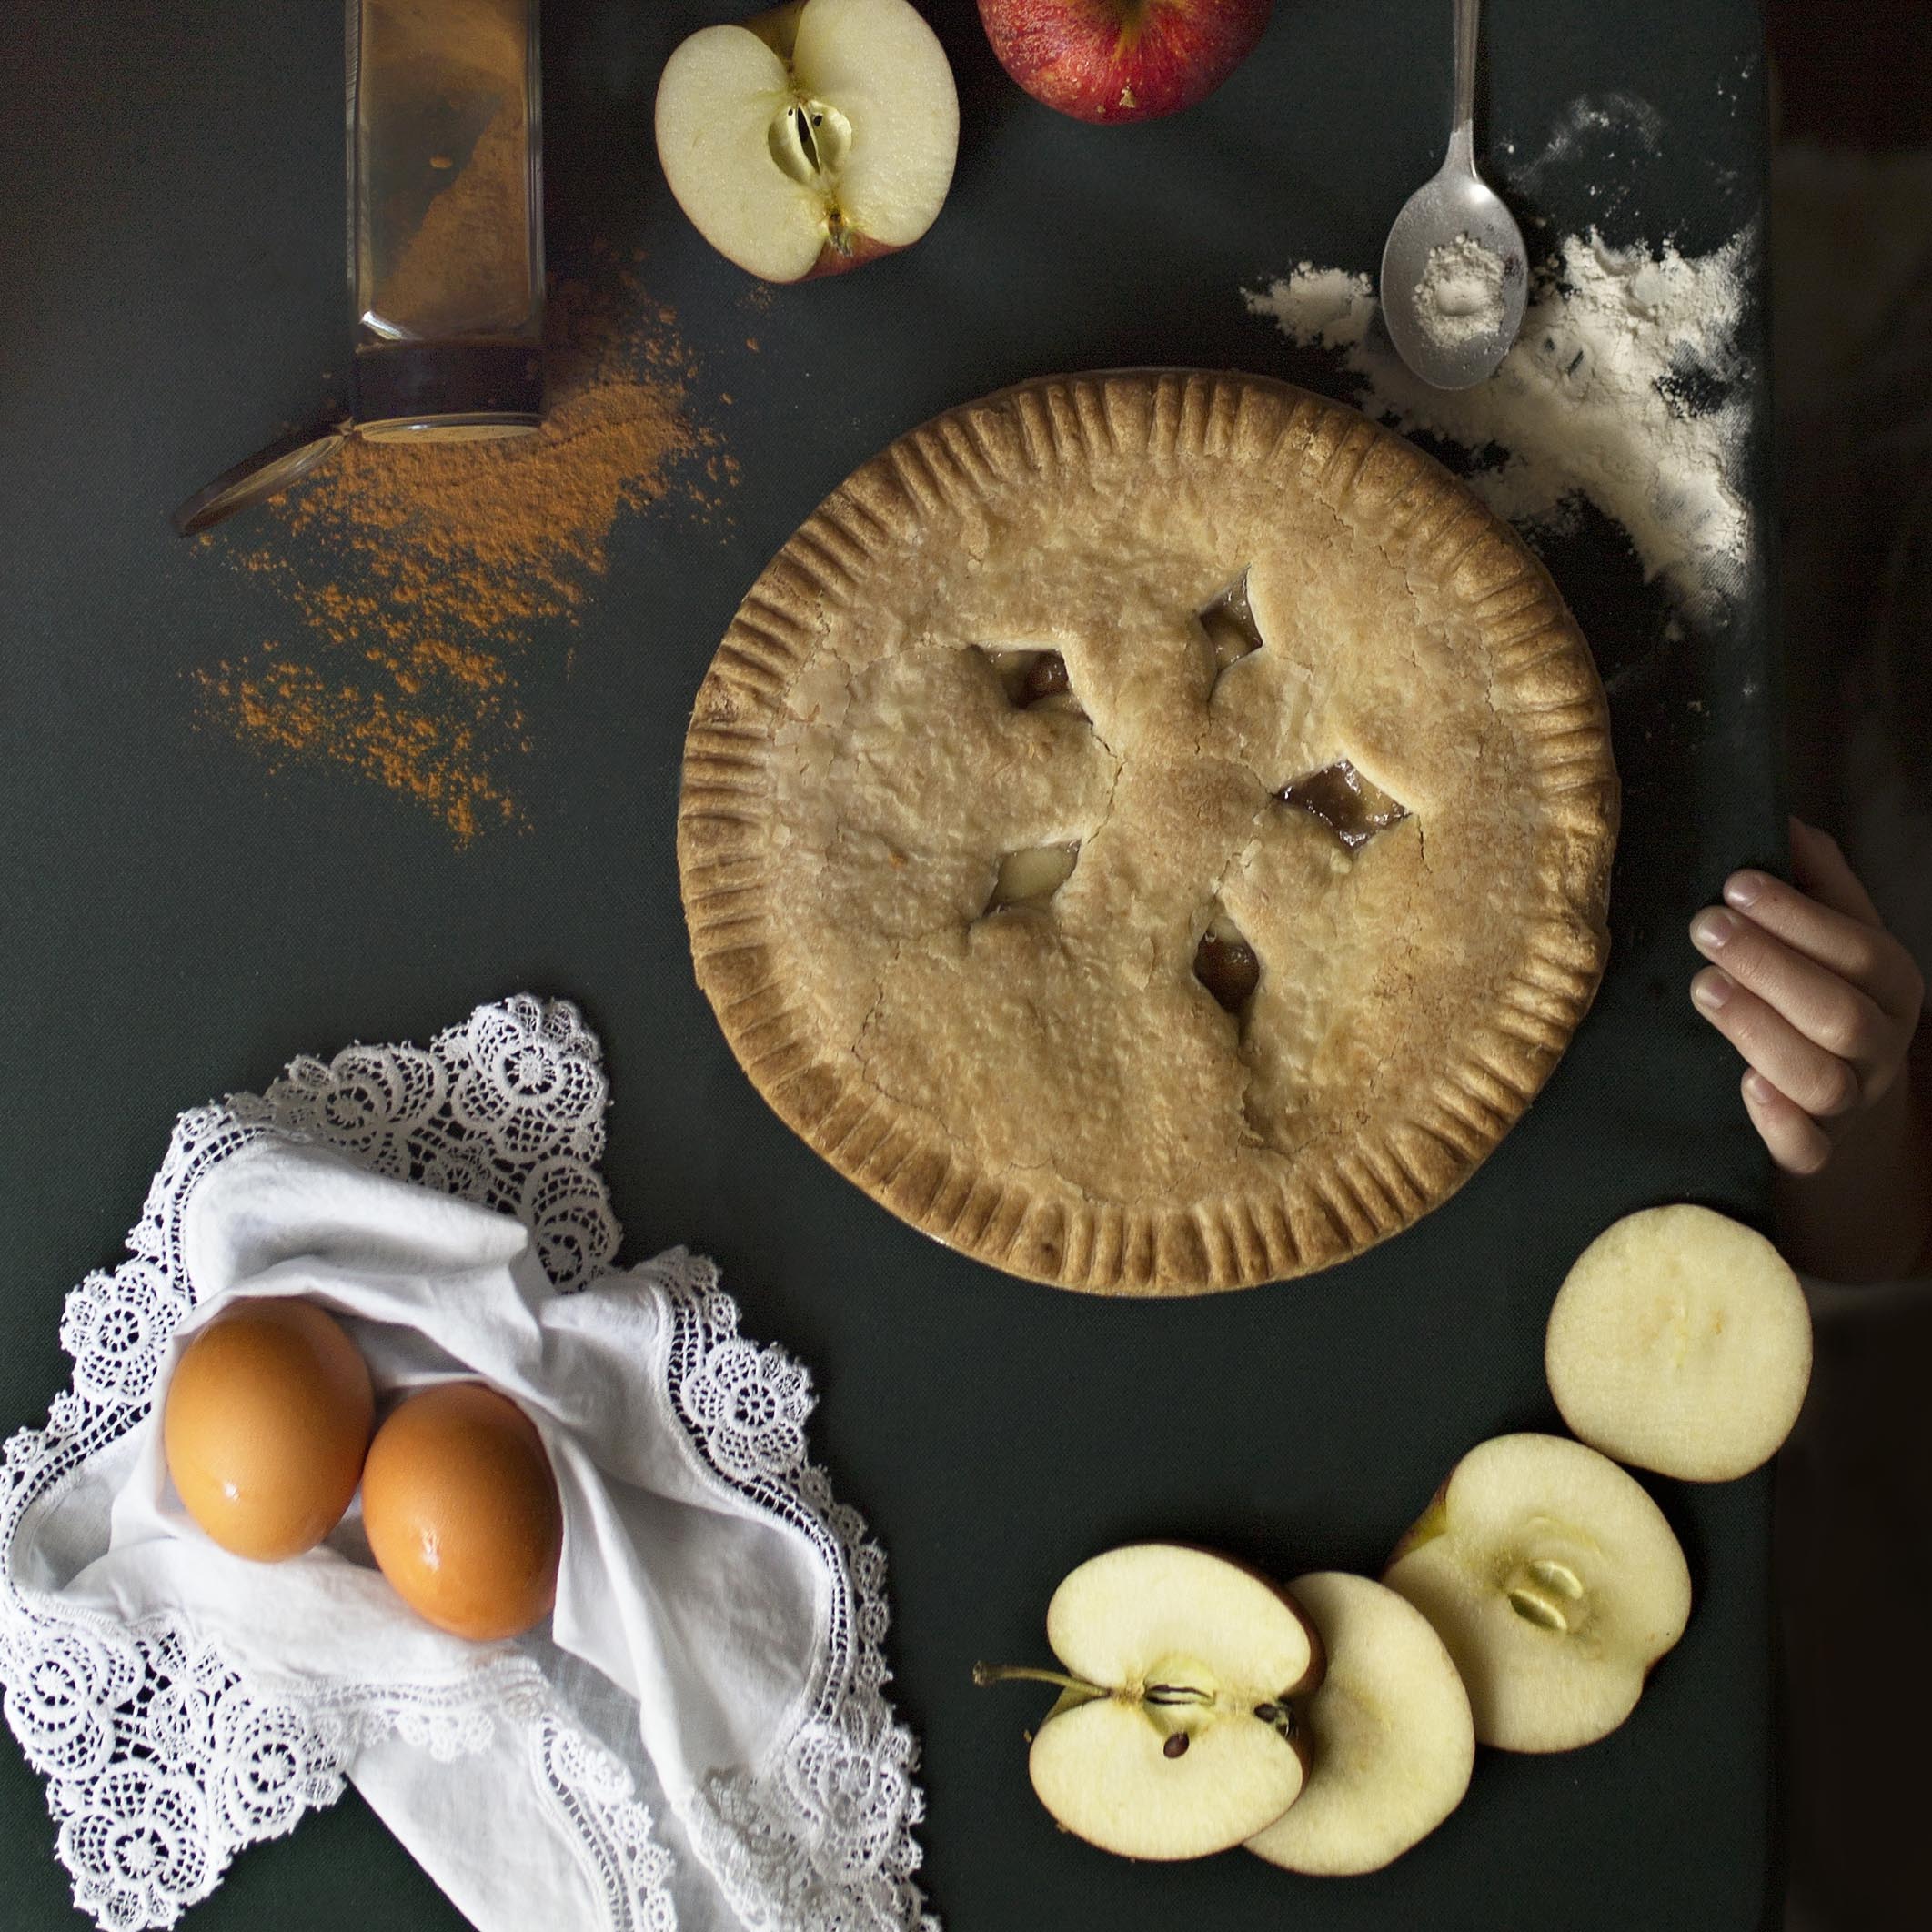
You can see here I have placed these eggs on a lace handkerchief. I feel it adds dimension to the image. I love the texture of the lace against the smooth, round shell of the egg. It creates contrast. But you will also notice that I only have the eggs on the handkerchief. I don’t have eggs, and apples, and a spoon and flour on the handkerchief because that would be way too much going on at once – visual overload!! So think strategically and carefully about how to place your images and how you want to layer them.
In another example, you can see (in the blueberry muffin image further above) how I placed the yellow cloth under the muffin tin. The yellow contrasts well with the blue in the berries and also contrasts well with the hard reflective surface of the muffin tin. The hard tin and the soft cloth contrast well together as opposed to a soft cloth next to another soft object.
Ok, so I just talked about placing things evenly and now I am going to talk about creating messes. I always like to have a little bit of a mess in my flat lays if I possibly can. Again, it adds to the variety and it also add a human element to the image. It is as if you knew someone was there to create the mess. You can see here (in this close up from my blueberry muffin image above) how I spilled a little of the lemon zest, or how the blueberries are casually strew about the table.
It is important to make your mess look as natural as possible. You have to actually make a mess. If I were to place each blueberry exactly the same distance apart it wouldn’t look like a real mess, but like someone just placed blueberries in a pattern on the table. So when you are making a mess it is ok to have the parts of the mess touch. If that makes sense!
Going Off the Frame
One last note about where to place your objects in your flat lay. You want to think about how you are going to frame your flat lay. Are all the objects going to be inside your frame or are things going to be placed on the edge? Having things placed on the edge of your frame (meaning the viewer is only able to see only part of the object) leaves a sense of mystery for the viewer. It leads their eye to the edge of the photo and leaves them wondering what is happening on the other side of the frame.
Having objects just on the edge of your frame also helps to lead the viewers eye into the scene. We view photos the same way we read a book. From the top left to the bottom right. So whatever object you have at the top left is key because it will be the first thing your viewer’s eye lands upon. And whatever you have at the bottom right will be what their eye finally rests upon.
In this image of my son I wanted him to be the main focus of the image so you can see I have placed him here at the bottom left.
Adding a Human Element.
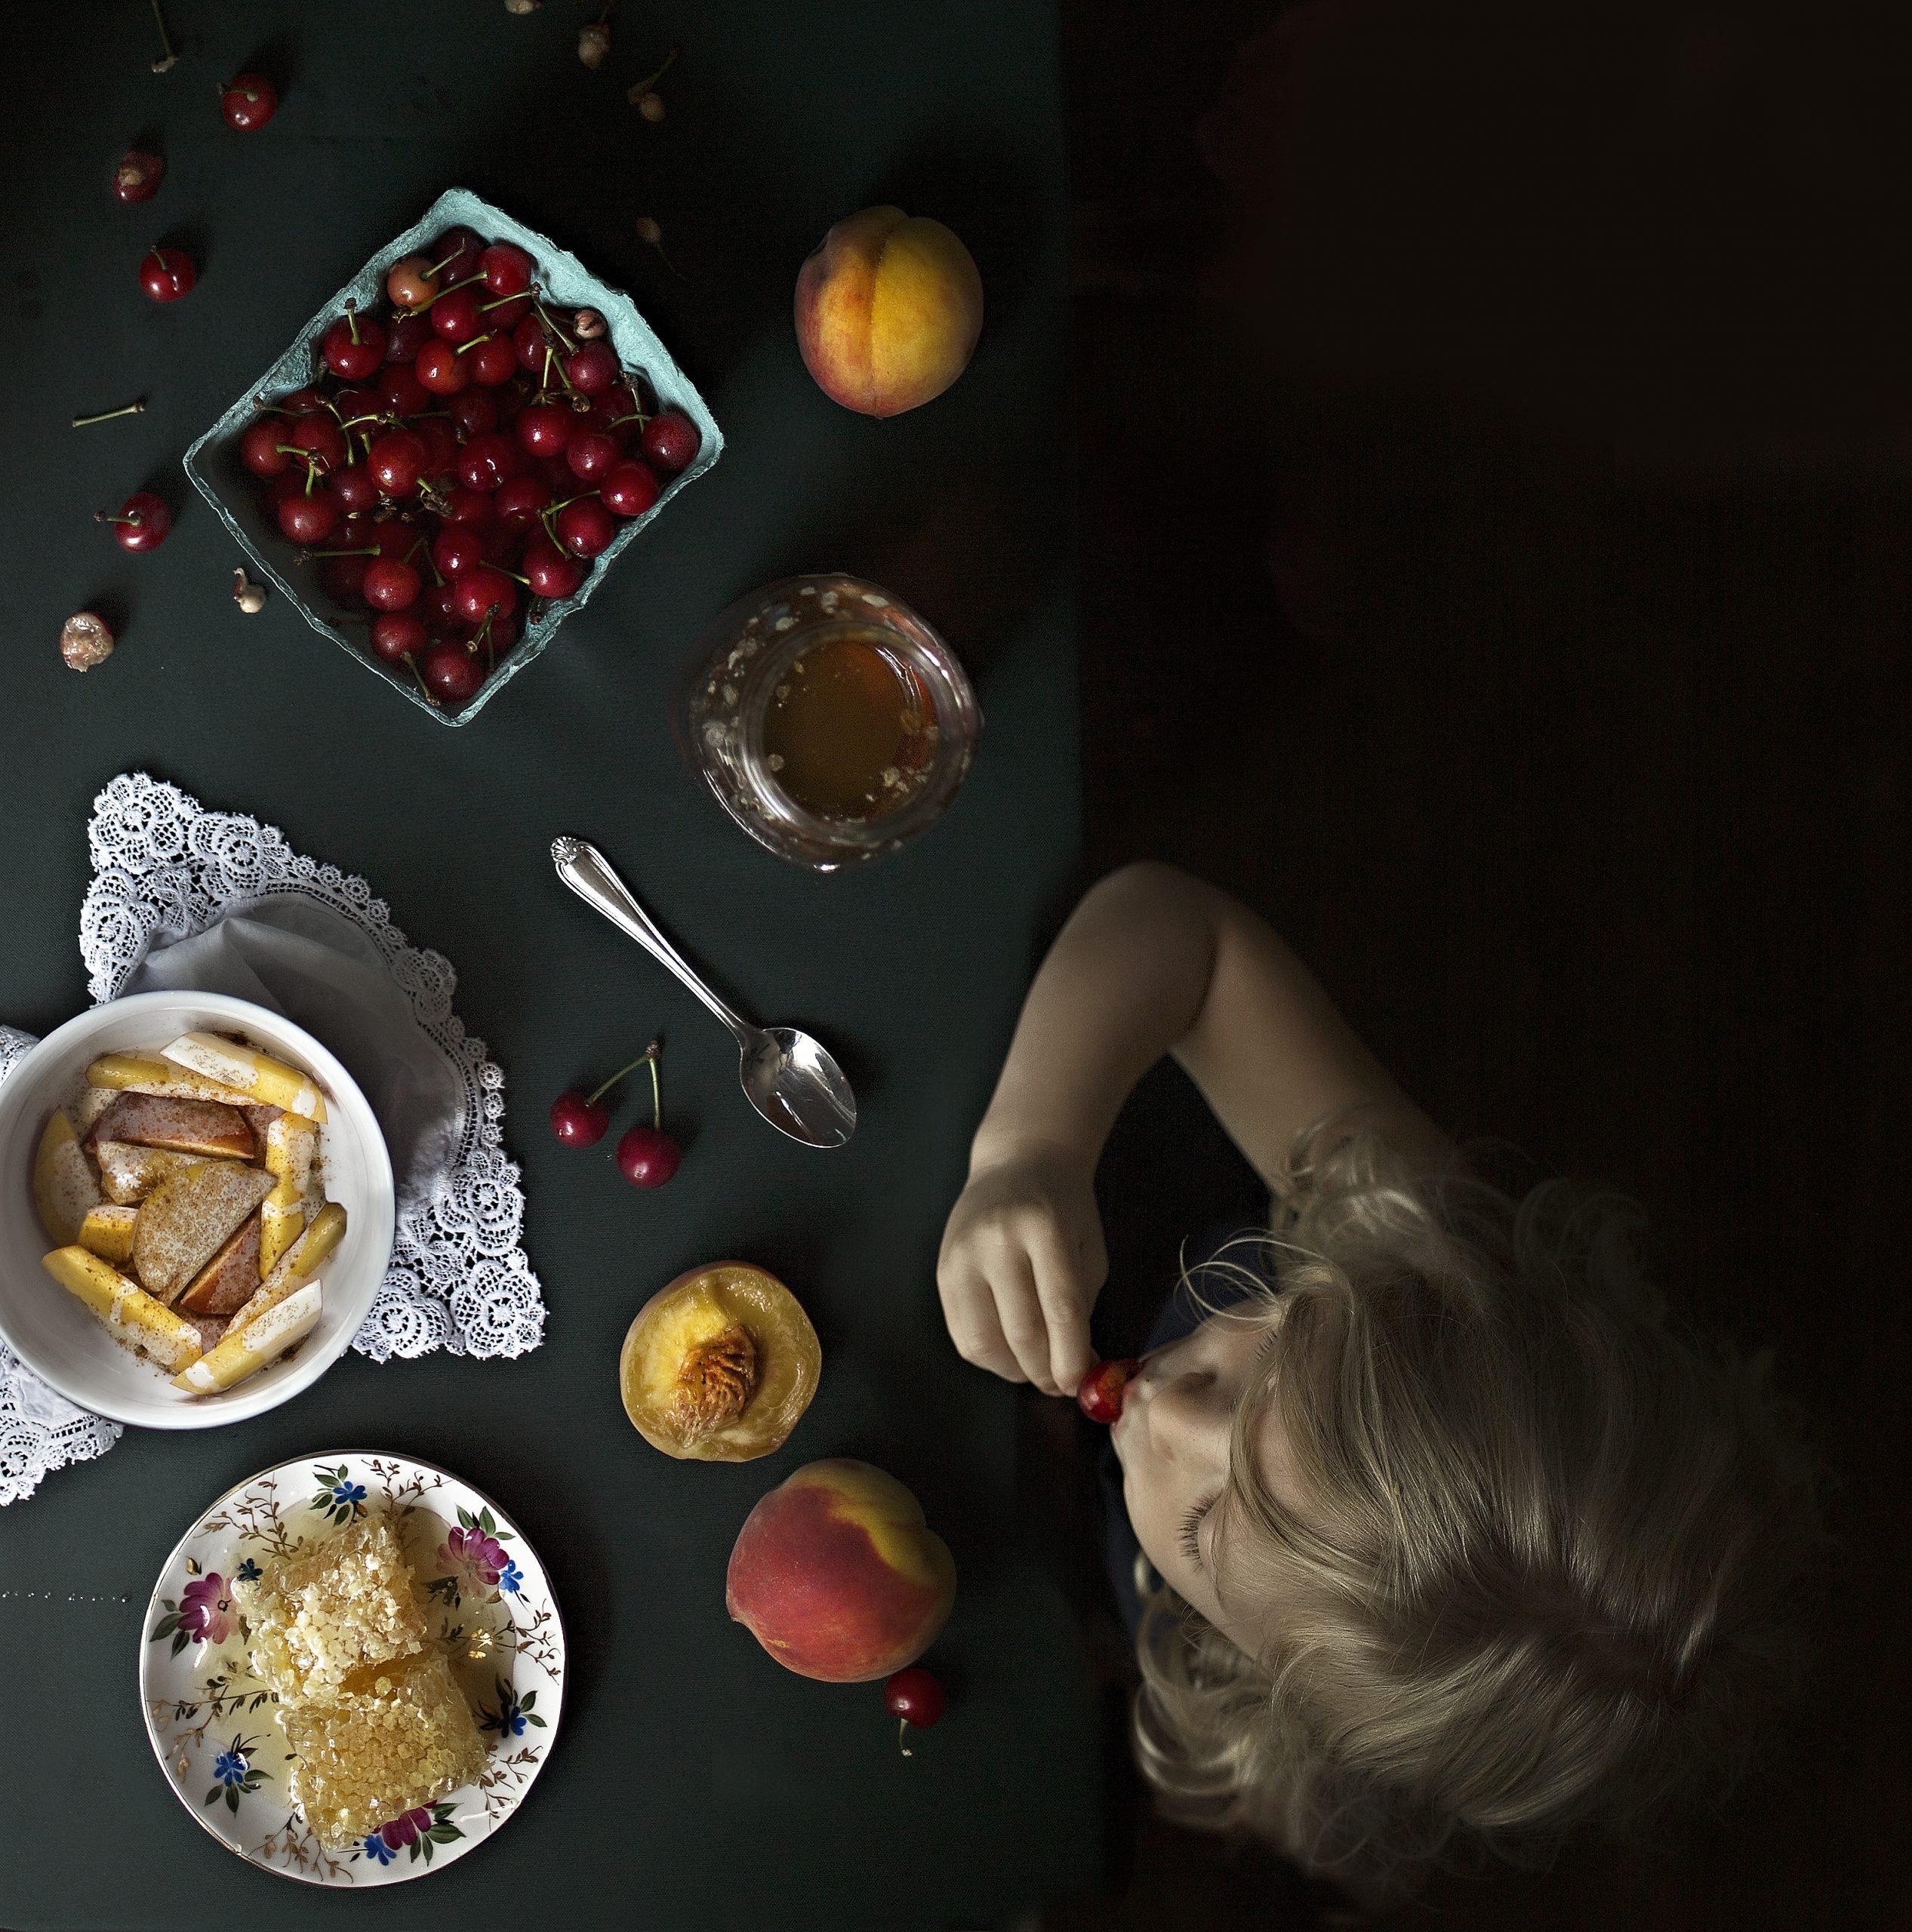
I personally love to add a human element to my flat lay images. Now you can do this by simply creating a mess, like I mentioned earlier. It lets you know someone or thing (a pet for example) was just in the image to make the mess. It adds to the storytelling of the image. Or you can actually add a human being in the image. I like to add my children. As we can clearly see in the image above, my son is actually in the picture interacting with the flat lay. But you don’t always need to add the whole person. You can in my lemon image further above, that I just have a child’s hand reaching in to hold the lemon. Just something to give it a more human feel and to add dimension to the photo.
Think Outside the Table
Now I know a lot of people thing of flat lays as just small groups of objects on a table, but think bigger people! You can see in the image below that I take my flat lays to a whole other level and do them on a much larger scale.
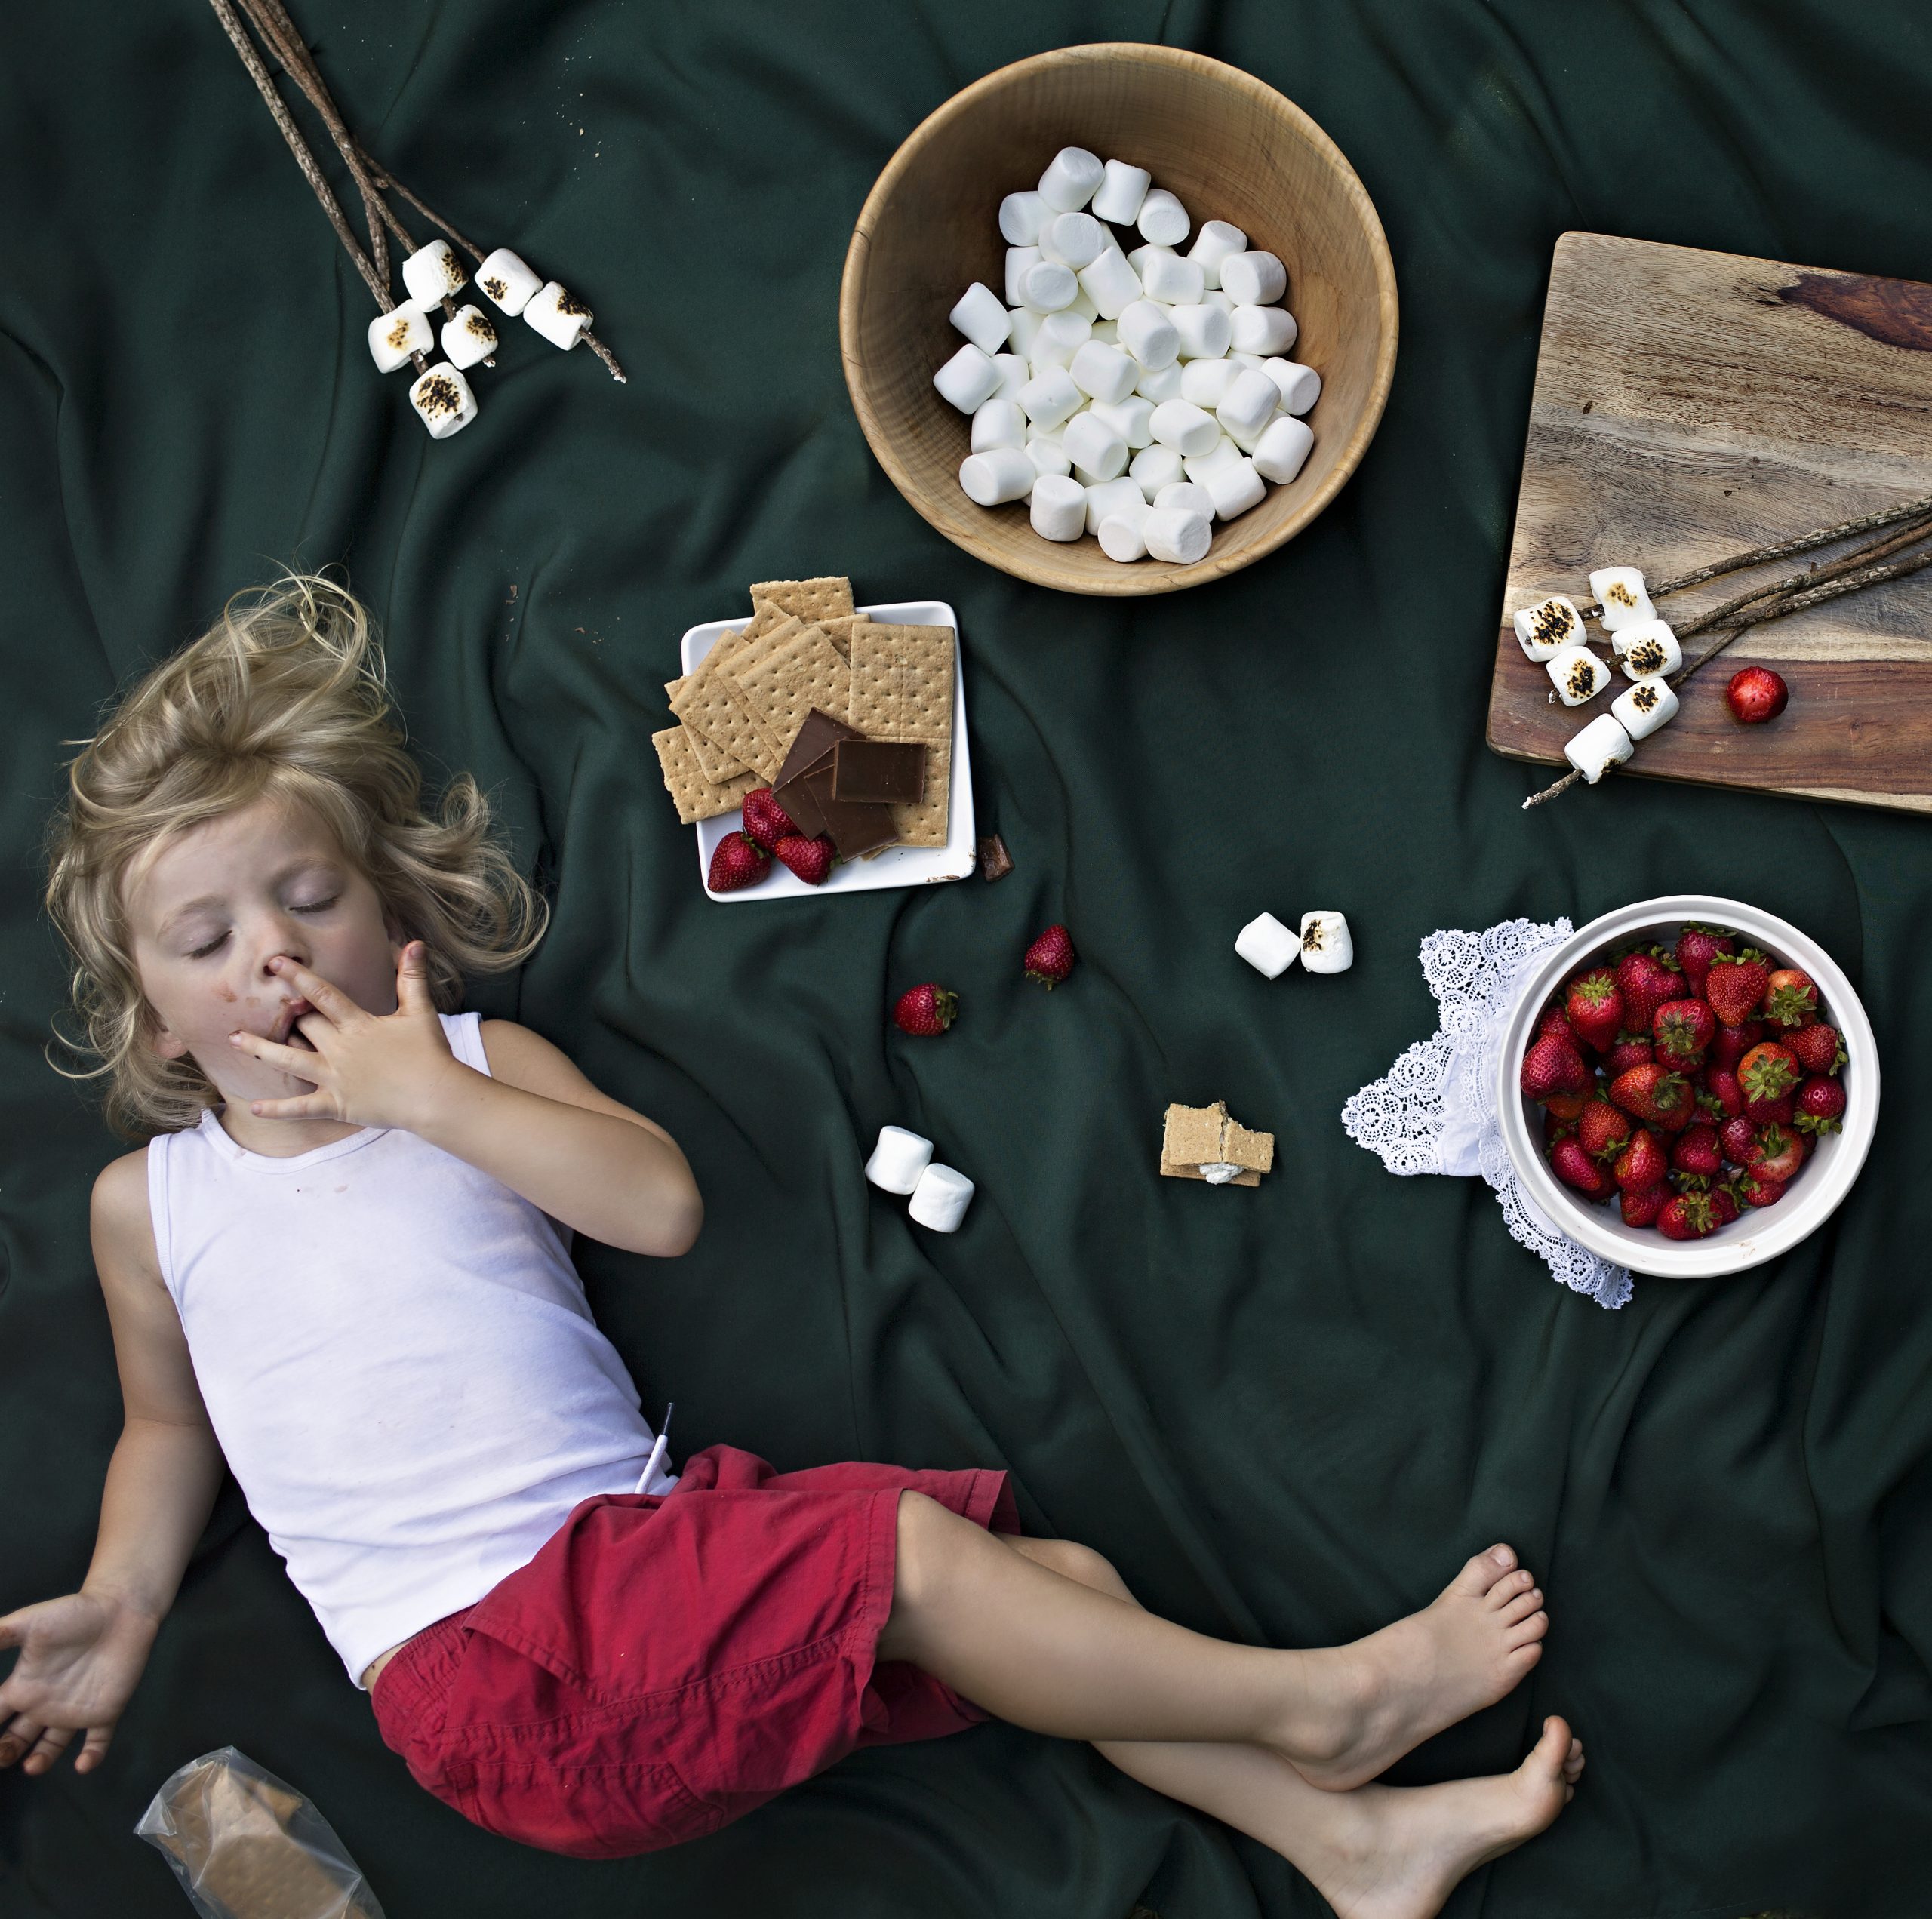
I love this picnic blanket series of flat lays with my children. Literally my whole child is in the photo but I still follow the same guidelines I would use in creating a much smaller flat lay. So think outside the box and incorporate yourself into your flat lays. Use your hand to hold a cup of coffee or a book in your flat lay. Anything to add to the story you are trying to tell.
Last, but not Least, is Light
Now I shoot all of my flat lays with natural light. I literally bump my little table right up to a window in my house that gets good light and I shoot away. If I am shooting my picnic blanket series I head outside. Thinking about how the light interacts with the objects in your flat lay is critical. You want to place that beautiful shiny spoon closer to the light so that you get that pretty reflection, but maybe that bright red cloth you are using can go more towards the darker edge of the frame so that is doesn’t overpower the rest of your image. And make sure that the main object of your flat lay is the most brightly light. Our eyes naturally gravitate to the brightest point in a photograph.
So there you have it! My top tips for creating awesome flat lay images. Using these will help you take your flat lay game to the next level. Let’s recap super quick!
Flat Lay Tips
- The foundation – choose complimentary colors that go well together
- The background – pick a background that adds to your storytelling and is visually stimulating
- Texture, Shape, and Size – Remember variety is the spice of life and to choose objects of different textures, shapes, and sizes
- Choose a focal point – Choose a main object to make the centerpieces of your flat lay and then build around it
- Placing your images – Think carefully about where you place your images. Place them evenly for visual clarity and only use layering and messes strategically
- Going off frame – think carefully about what images you place on the edges of your frame. Remember to lead your viewer into the image.
- Add a human element – decide whether or not you want to add a human element to enhance your storytelling through creating messes or actually having all or part of a human in your frame.
- Think Outside the Table – How far away are you shooting from your flat lay? Are you up close on a table or are you shooting a much large scene like a picnic?
- Light – Remember to think about how the light interacts with the object in your flat lay. Is that reflective object getting enough light to really make it shine? Is there plenty of light on the main focal point of your image?
OK, go set up your next flat lay!!
XO,
Ruth
Ruth Young is a professional portrait photographer based in Culpeper County, Virginia. She spends her days homeschooling and documenting the lives of her four (soon to be 5) children. To learn more about Ruth and her journey you can follow her here on Instagram, where she posts daily!


Your blog is full of fresh ideas! I’ve been hooked for nearly an hour. Thanks a lot!