 There is nothing that will affect the quality of your photograph more than lighting! Photography is literally capturing light. Understanding natural light photography can be a tricky thing. If you are shooting in a studio then you can control the light. But if you are shooting with natural light, you will quickly learn that it is constantly changing.
As the sun rises, the light grows brighter, as the sun sets, it grows dimmer. The sun at mid day is completely different than the sun at 7:00pm.
On cloudy days the light is completely different. Maybe it is overcast and you have beautiful, even lighting (which is one of my favorites), or perhaps the sun is peaking in and out from behind the clouds, which can be a challenge as you battle the light changing minute to minute.
Whatever the scenario, having a solid understanding of how light works is essential to making quality photographs on a consistent basis. In this post, I am going to give you as much information as I can, so that you can have a better understanding of how to use natural light in your photography. And I am going to attempt to make it as simple and easy to understand as possible.
SEEING THE LIGHT
You may have heard photographers talk about “seeing the light.” When a photographer learns to “see the light,” they have reached a transformative moment along their photography journey. They now understand how to truly work with light.
Know that this takes time and above all do not get discouraged! I used to think I could “see the light” because I could literally see it coming from the window, or the sun, or a lamp. But now I know how much I did not understand.

I shot this image in this particular spot because I saw the perfect pocket of light shining down through the trees.
ASPECTS OF LIGHT
There are three basic aspects of light.
- Direction of light – Where is the light coming from? Is it high in the sky, shining directly down on your subject? Perhaps the early morning light is slanting in sideways through the window? Or you are just catching the last rays of light as the sun sets on the horizon? Begin to look at where the light is coming from and how it affects your image.
- Quality of light – Is your light harsh or soft? A bright, harsh light is going to cast strong shadows. While a soft light is going to create softer shadows. Depending on what you are trying to achieve in your image, the quality of your light is going to make a huge difference.
- Color of the light – The color of your light sets the tone or mood of your image. Are you shooting the warm glow of a sunset or the cool mist of a morning sunrise. The warmth or coolness of your light is going to have a major affect on the skin tones and the tones of any colors in your image.
In this post I am going to do a deep dive into each of these essential qualities of light. By the end, I hope you have a better understanding of how to use light to make amazing images.
When you understand how to use light to create your images it sets you free. You are no longer struggling, wondering why your images aren’t looking the way you want them to. Once you have a foundational understanding of light you will really begin to start making images that look more professional and be on your way to bettering your natural light photography.
DIRECTION OF LIGHT
It is very important to understand where your light is coming from. Once you determine the direction your light is coming from, you can decide how you want to work with it.
When shooting out of doors, or even when using window light, the direction of the light is frequently going to determine where you can and cannot shoot. You may have your heart set on shooting by a beautiful tree, but if the light isn’t right you may have to move to a better light location.
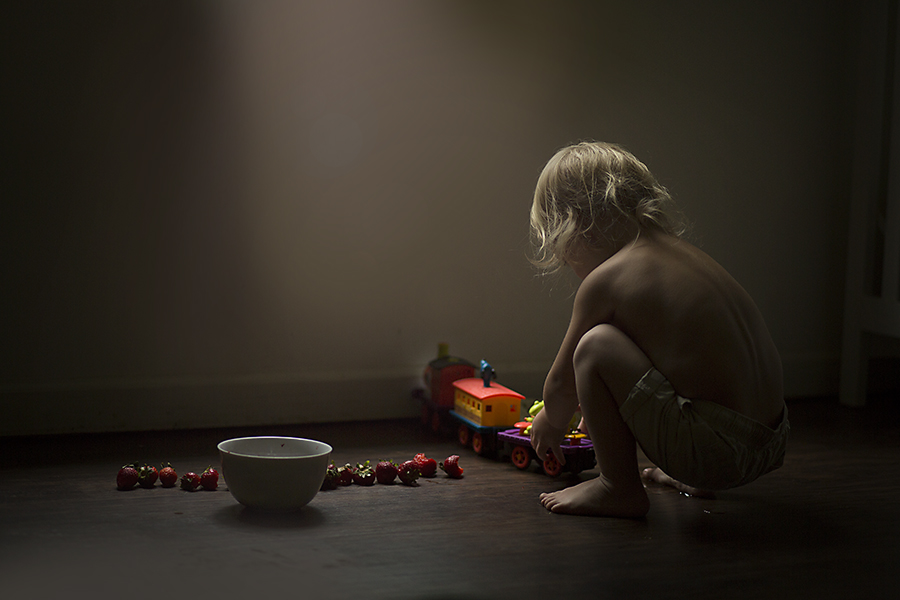
I shot this image of my son playing in his room. The light is shining down from the window above him. If he had been in another spot in his room the lighting would not have been nearly as dramatic.
QUALITY OF LIGHT
The quality of your light is another important factor. Harsh light is going to cast harsh shadows on your subject. Whereas soft light is going to cast… you guessed it… soft shadows!
When I refer to harsh light, think of a bright sunlight at mid day. The kind of light when you wish you had a pare of sunglasses to shield your eyes. Or perhaps the glare of headlights in the night. These are examples of harsh light.
On the flipside, when I refer to soft light, think of the early morning light as the sun rises, or the soft glow of flickering candles.
The quality of your light can play in a huge role in the overall look and feel of your final image. It is up to you and your artistic vision to determine which looks best for your style of natural light photography.
Depending on the mood you are trying to convey with your photograph, you will want to decide whether you want harsh or soft shadows.
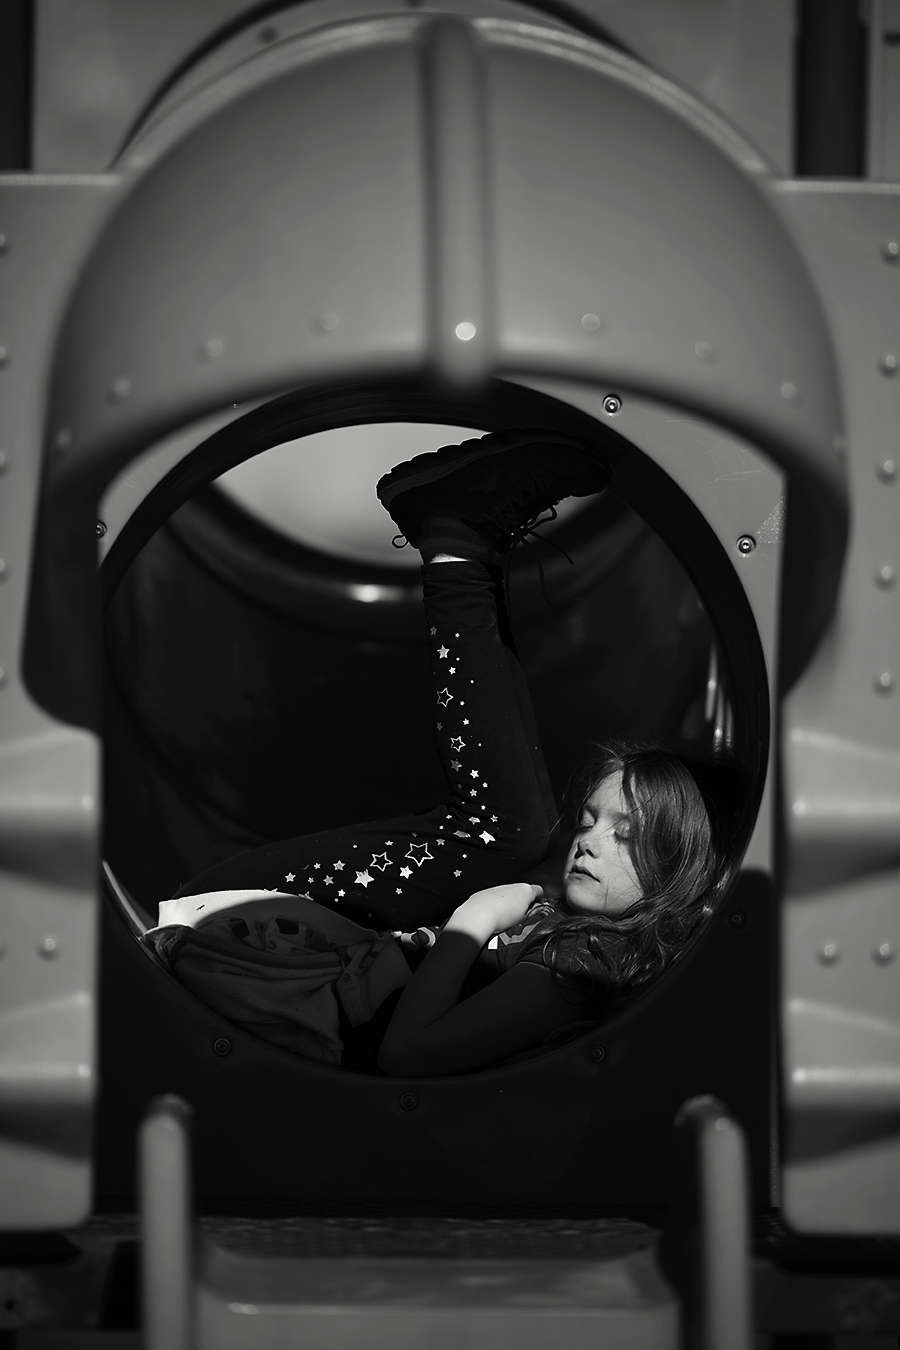
This image was shot in the middle of a bright sunny day. The sun is high in the sky, directly overhead. As a result, you can see a strong contrast between light and dark. You can see the strong shadow her nose casts on her face.
COLOR OF LIGHT
And finally the color of your light is going to affect your overall image. The temperature of your light is going to make a big difference in the tones of your final image. This is especially important when you are trying to capture accurate skin tones.
When I refer to the temperature of light, I am talking about how cool or warm the light is. The light our eyes see falls on a spectrum which runs from cooler to warmer tones.
Think the colors of the rainbow. Purple, blue, green being the cooler colors. Red, orange, and yellow being the warmer colors.
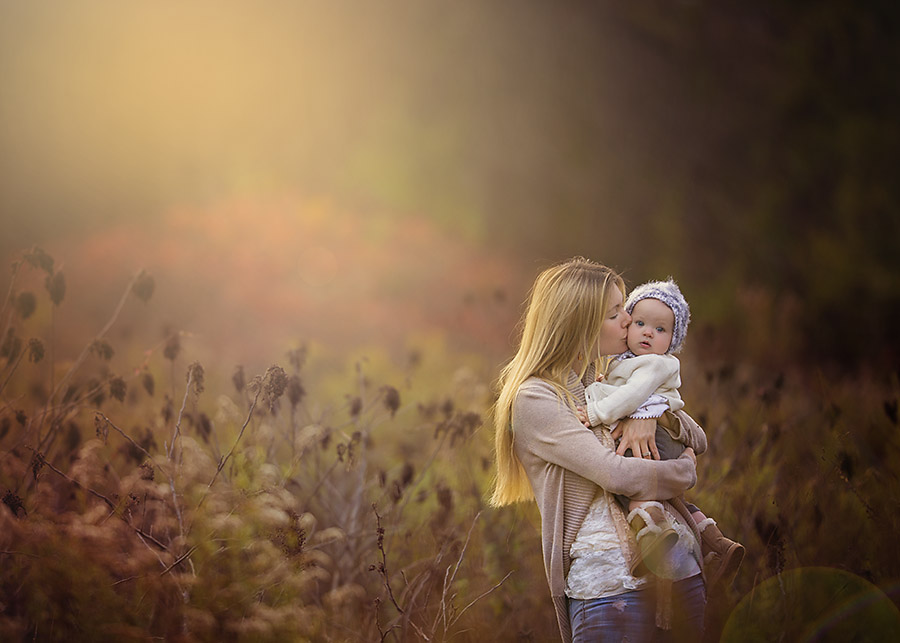
If you go outside and watch the sunrise in the morning you are going to notice that there is a blueish tint to the light. If you watch the sunset the same evening you will notice that the light is a shade of yellow. This is why you may have heard the term “Golden Hour” in natural light photography.
“Golden Hour” refers to the beautiful golden light that is cast at sunset. The soft, yellow light flatters skin tones and makes it a prime time for natural light photographers.

I shot this image at sunset. You can see the golden light shining on her from the right. The sun was very low and so it cast very soft, yellow shadows on her face.
If you are editing your photographs with some type of software (I work with Photoshop and I cannot recommend it highly enough!) then you will most likely have the option to adjust the color of the light in your photographs. This is an extremely useful tool and can help to correct any unwanted color tones.
REFLECTION
Have you ever tried to take a portrait of someone sitting in green grass, only to find that their skin seems to become a strange yellow/green color? This is the light reflecting off of all that green grass and bouncing onto your subject.
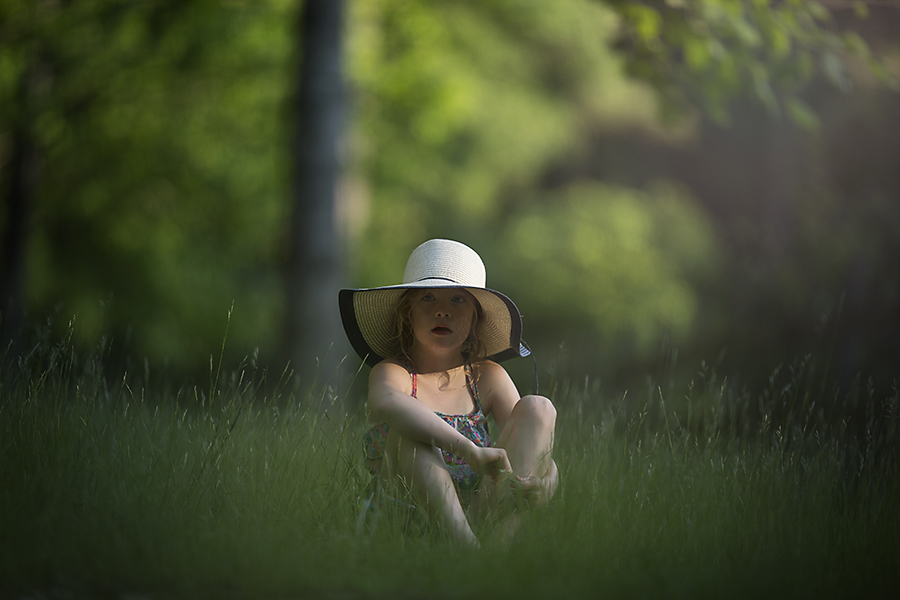
This image was shot in the green grass on a bright sunny day. Because the sun was so bright there was a lot of green reflected back into her skin. I had to do a lot of color correcting in photoshop and her legs still have a slight green tint to them.
Being aware of how the light you are using is reflected off your surroundings is extremely important. If you are working in a dimly light space you may want to use the reflected light to your advantage and try to bounce it back onto your subject.
However, if you are working in a brightly light area the reflection of the light might be overbearing. If there is too much light, your camera will have a hard time capturing the detail in your subject. This is why a brightly light scene will often just appear white (or have white spots) in your camera.
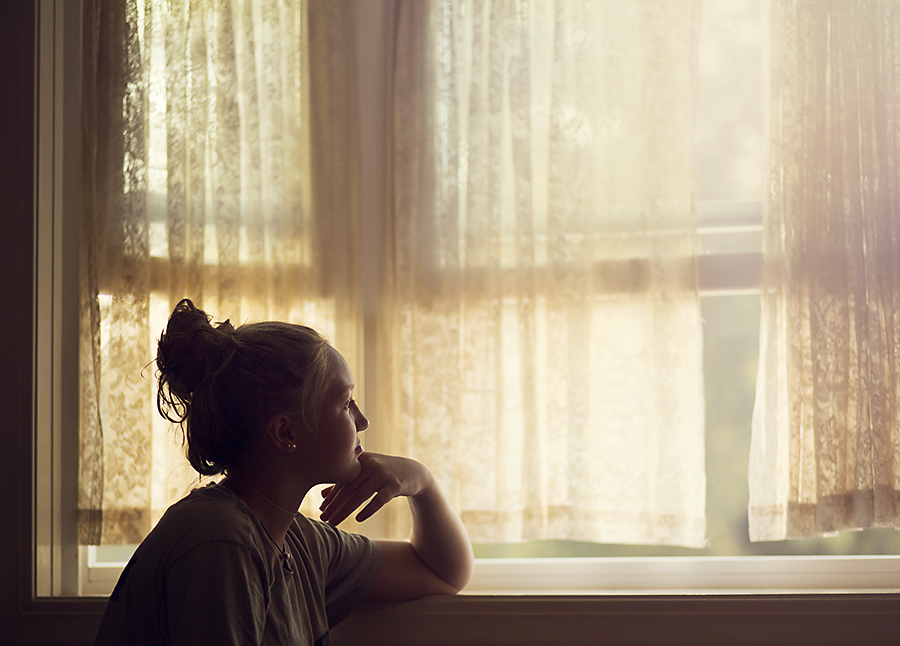
In this image I had to close the curtains to soften the light. If I had left them open the light would have been much too bright.
In this instance, you are going to want to do what you can to eliminate the excess light. You may want use something to block or at least soften excess light. When shooting by a window think about opening or closing the curtains to manipulate the light. I will often use a simple sheer curtain to soften harsh light.
It is also important to be aware of what color the light is reflecting. As I mentioned in the green grass example above, light will take on the colors of the object off of which it is reflected. So if you are shooting an subject in a brightly painted, red room, you may notice hints of red reflected in your subject’s face.
How to Practice Working with Light
I’m going to share with you my very favorite exercise to begin practicing working with light. It is a simple exercise that you can practice right at home with your camera, a window, and a willing subject.
If you don’t have someone you can use to practice with, then you can still do this exercise. Just use a bowl of fruit, a stack of books, anything you can think of as a still life “model.”
I like using a window for this exercise because it give you some control over your light. At least you know where the light is coming from and you can look at the light and see how harsh or soft it is. Is it direct or indirect light?
If the sun light is shining directly into your window, it is direct light. On the other hand, if the sun is shining on the other side of your house there will still be light coming into your window. This is indirect light (that is light that is not directly shining at you).
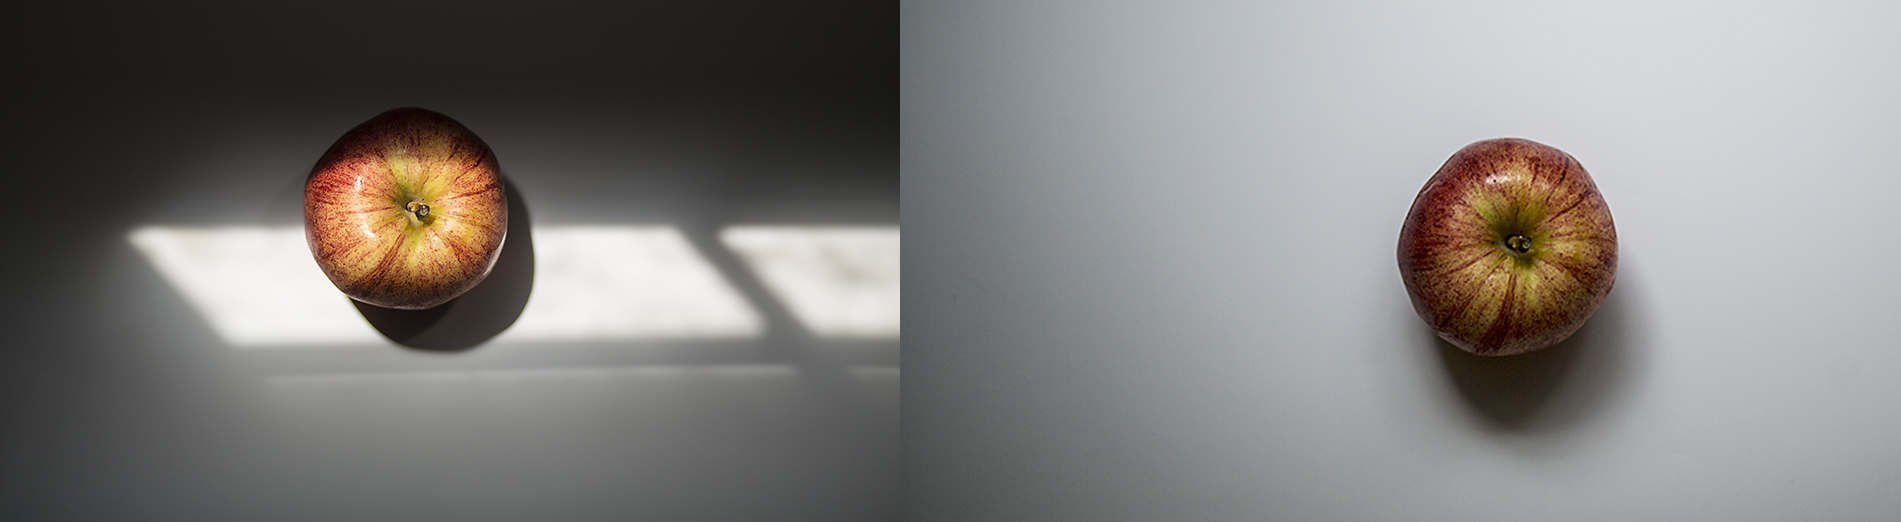
The apple to the left is in DIRECT light. You can see the harsh shadows and the shadow of the window panes on the white background. The apple to the right is in INDIRECT light. You can see the shadow cast by the apple has much softer edges and the window is no longer reflected in the background.
As you might have guessed, the direct light is going to be stronger, or harsher, and is going to create darker shadows on your subject. Indirect light is going to be softer, thus creating softer shadows.
I personally find softer shadows to be more flattering when shooting portraits. Walk around your house (or wherever you are shooting) and begin to examine the different types of light at each window.
Once you have chosen your setting, you can begin to use your subject to practice working with the light. Place your subject by the window and have them turn slowly in a circle.
Watch how the light changes on their face. When they face the window you will notice that their face becomes bright and full of light. But if he or she turns away from the window, their face is cast in shadow. This may seem like a simple exercise, but it is highly effective at helping you learn to see the light.
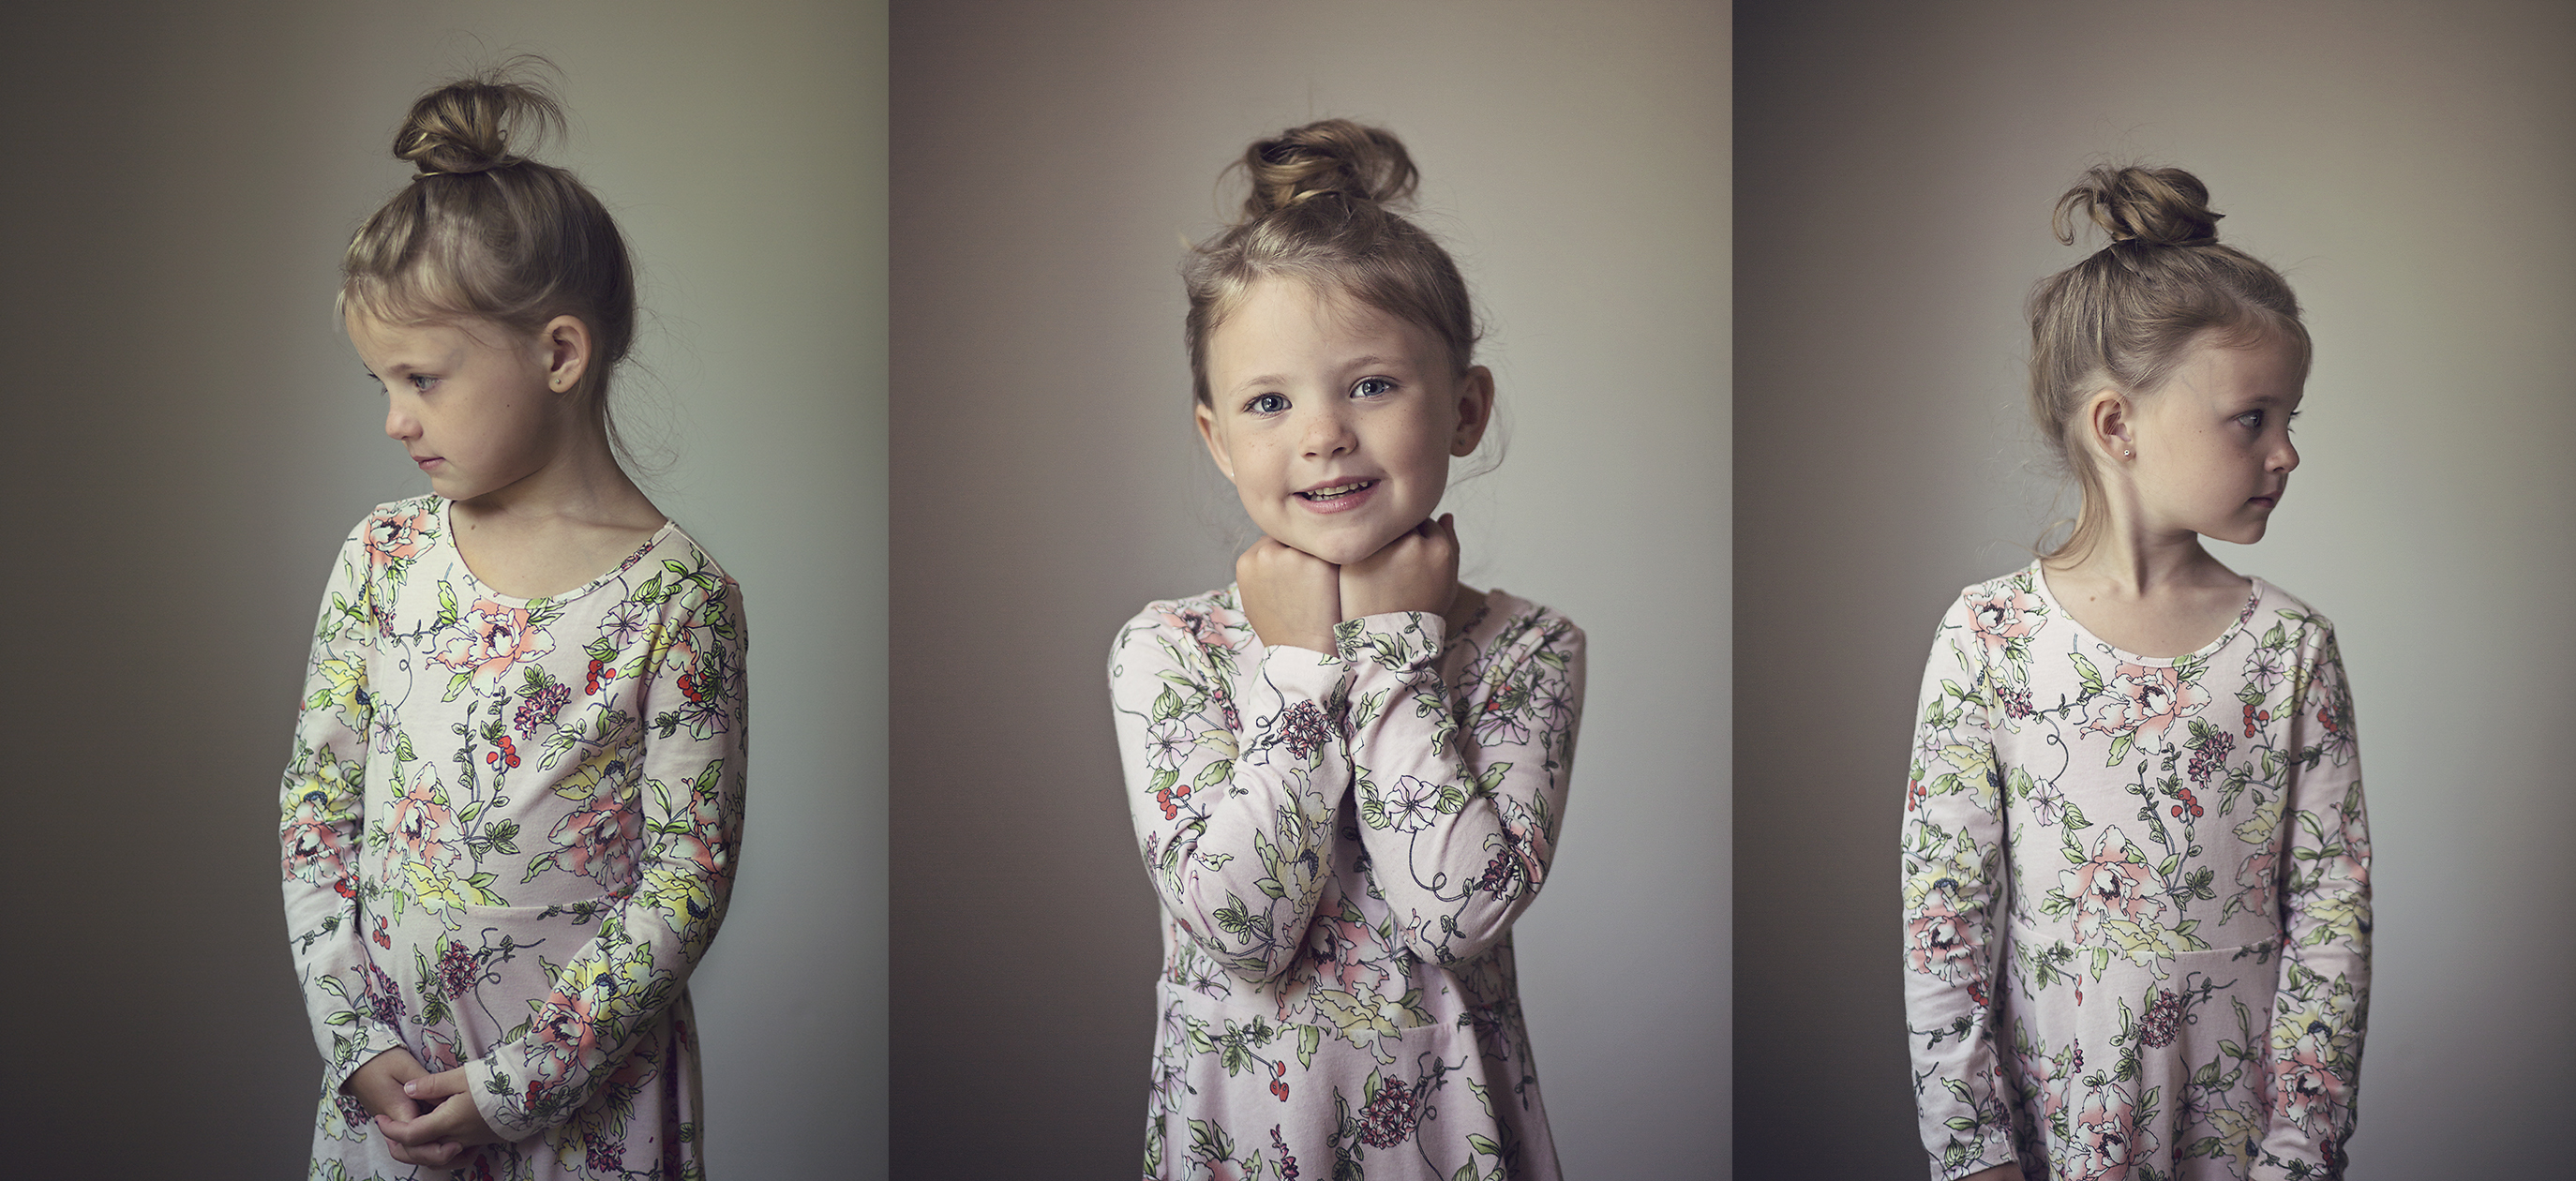
In this example the window is to the little girl’s left. You can see how the light changes on her face as she moves it toward or away from the window.
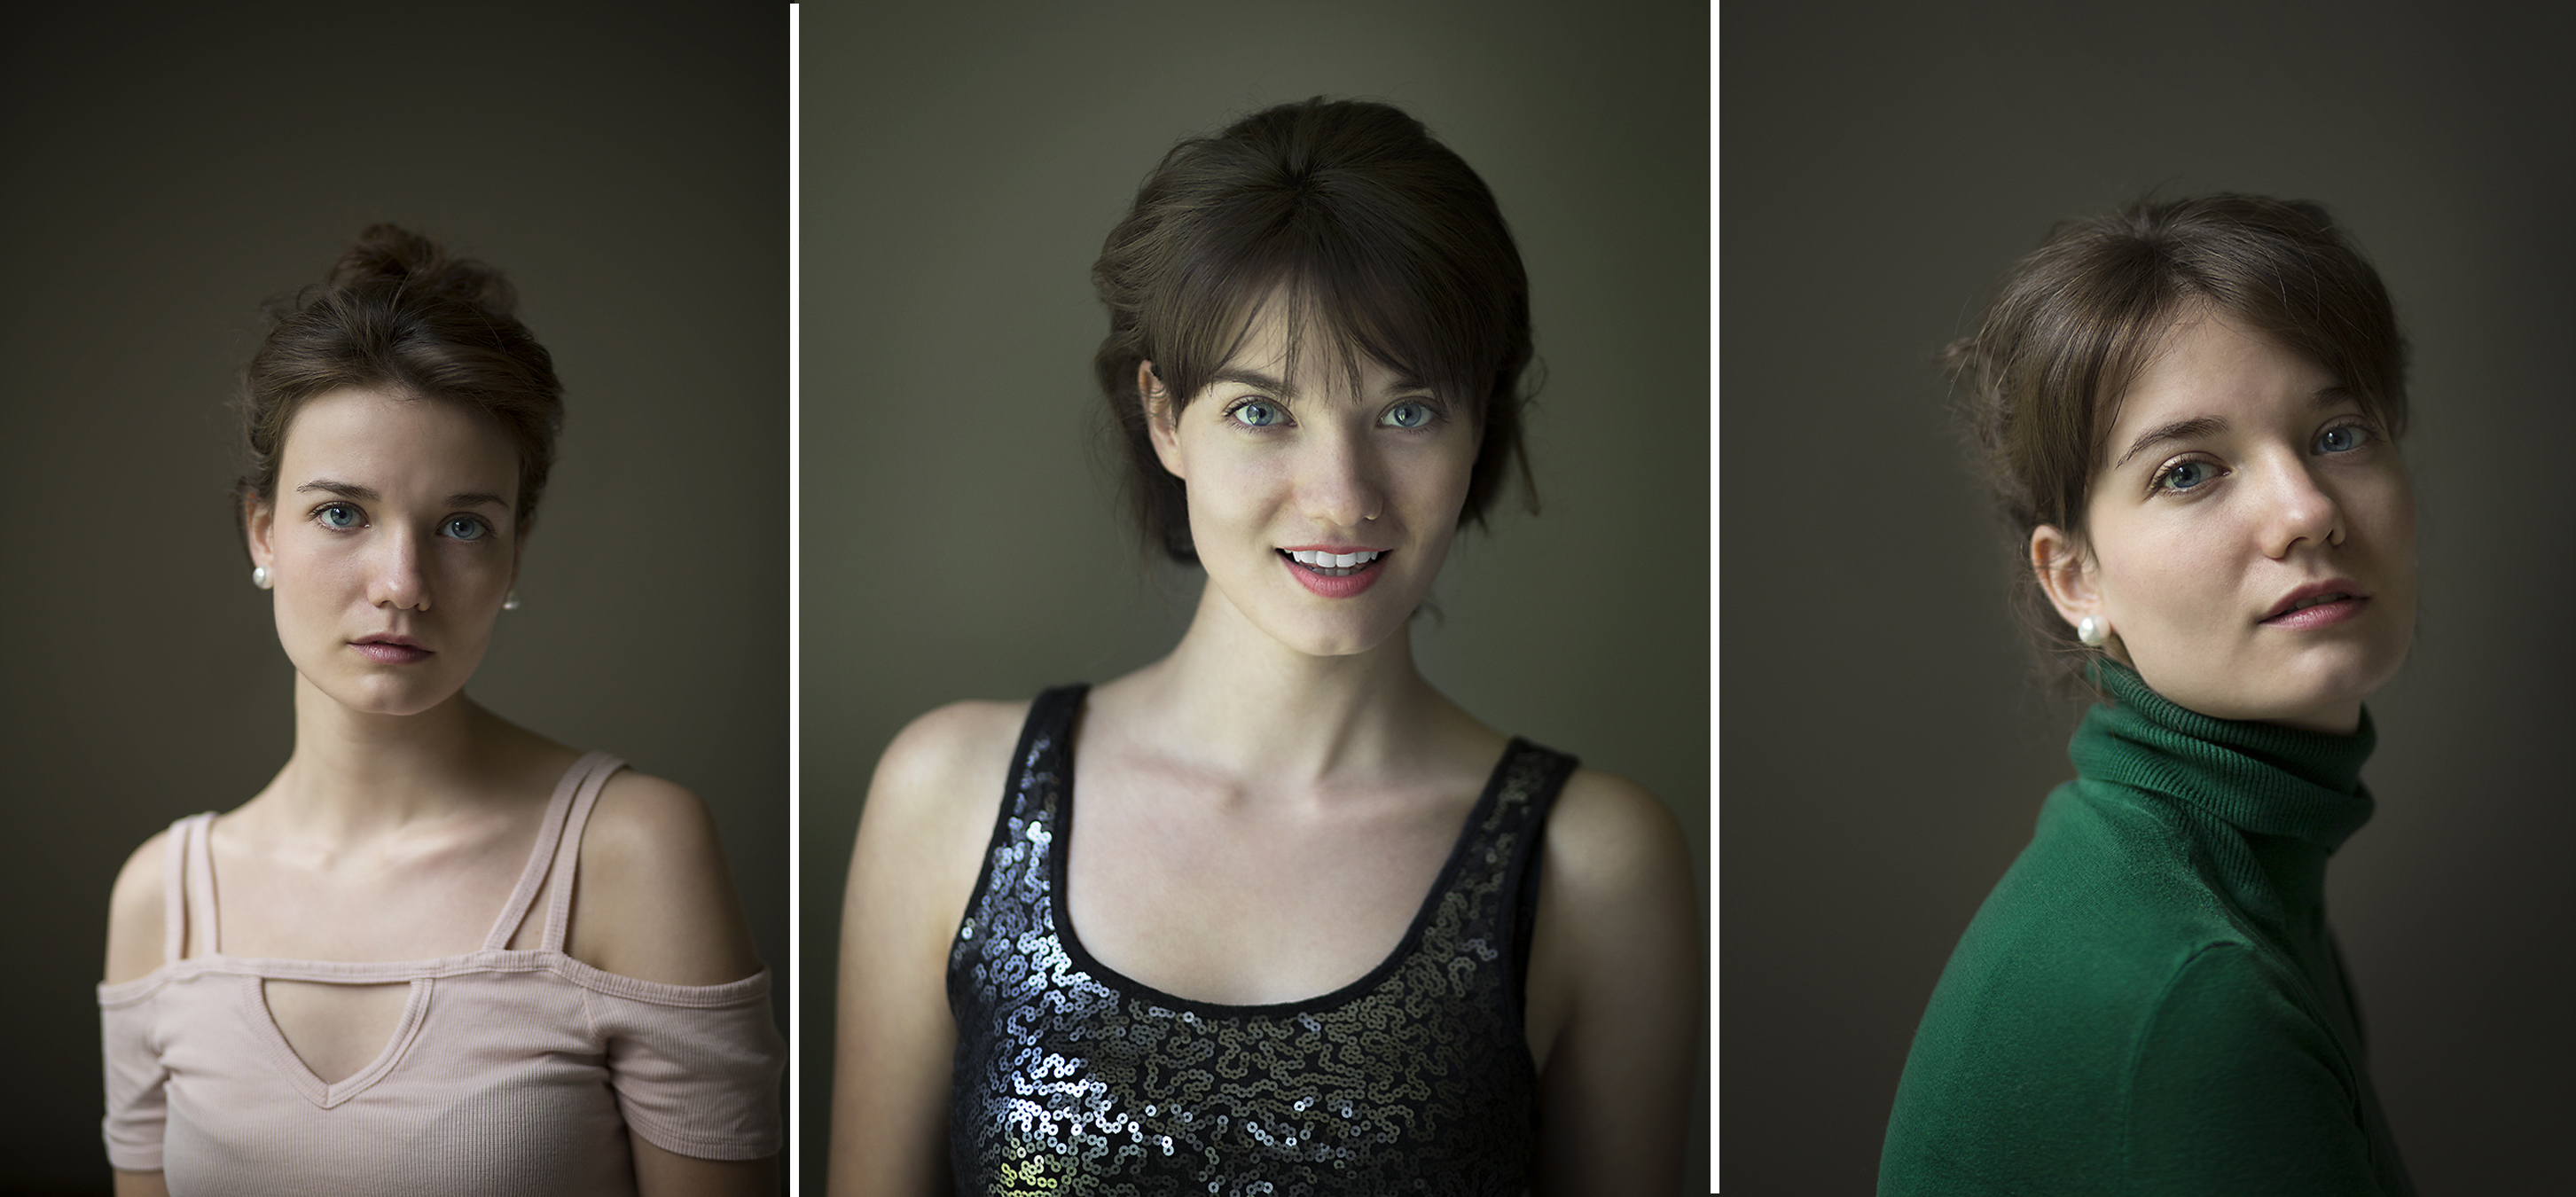
Practice moving your subject around in relation to the window and watch how even the slightest movement can change the light. Move them close to the window, then far away. Have your subject sit in a chair, and then stand, and watch how the light changes. If they stand at the front of the window, or at the end of the window the light will change.
I used to think that you could just place your subject next to a window and bam you had wonderful light. But there is really much more to it. The slightest change will make for very subtle differences.
You can see an example of this in the image below. I took these head shots for my sister Jane (who is an amazing actress BTW!) I shot all three of these images by the same window. But I made slight changes in how I positioned her in relation to the light in each photo.
FINAL THOUGHTS
I hope this exercise give you something that you can take away from this post and begin implementing right away. Once you begin to understand how the light affects the subjects you are trying to shoot, you will begin to see a real change in your work. If you are interested in learning more about photography then pretty please check out my post Photography Basics for the Beginner Photographer.
Lighting is the most important factor in making good photographs. So practice observing the basic aspects of natural light that I addressed above.
- Direction
- Quality
- Color
This is going to help you build a solid foundation for understanding the many different subtleties of natural light photography. You are that much closer to “seeing the light.” Good luck!
XO,
Ruth


Be the first to comment